Wednesday 29 March 2017

Attempt on the Kings Treasure : Blood in the Sand

With the untimely death of Her husband, believed by many to have been at her own hand, Queen Iola of Troas has become one of the most eligible widows in our ancient world. With strong trading links into much of the Aegean, Troas is a wealthy country so eligible suitors have been making their advances from many prospective kingdoms. King Fartous Bhesamia the great ruler of Bithynia whilst somewhat older than the lovely Iola is one such and has arranged to send her a betrothal gift of gold, silver and wine. These he has despatched under a strong guard led by his eldest son Prince Tutak. Expecting that the normally good relationships with his neighbor King Pelopidas of Mysia will prevail the Kings' treasure has been sent by way of the direct trading route through the Coastal desert. But all is not fair in love and war, King Pelopidas also has eyes for Iola and he has despatched a force to intercept the treasure, to claim Iola for himself thus uniting their countries, knowing that their combined strength will prevent any kick back from the Bithynians. His foremost General, Kleitos has set an ambush close to the famous temple of Gwok..........
 
Queen Iola portrayed in mourning for the late King in a recent picture
It is only after the ambush has been launched that General Kleitos realises that to impress the Queen King Fartous has sent with the party one of his fabled War Elephants. Prince Tutak also expecting little more than a ceremonial visit has chosen to ride in an antique chariot. Whilst built to impress it does not have the mobility of more recent war machines. The rest of the convoy consists of infantry and spearmen from the Kings' Household and mercenaries from the wild Thracian lands to the North west.
As the ambush is launched the baggage train immediately falls back, supported by the Nikean Archers it makes slow progress, the archers frequently arguing amongst themselves whether to abandon the treasure or push forward (you can see them arguing in the picture above)
Part of the Mysian ambush force is made of lightly armed javelin men who rush forward from behind cover, luckily their range is short but arrows also start to hit the defending convoy troops, thinning out the light cavalry.
Prince Tutak riding his chariot at the front of the column surveys the Temple of Gwok, in the distance Slingers and Bithynian infantry advance looking to trap the baggage.
The Royal elephant driver urges his beast forward and despite being showered with tiny stones it charges......I think we know who will come off worse here. The Slingers gradually pull back before being trampled under foot, just as the driver is carving another notch to his tally he realises he is completely out of position, he now has to stop the animal and bring it back into battle.
An overview of the battle about half way through, the convoy to avoid being trapped is being forced to the north and has little space to manoeuvre, light cavalry and the mercenary troops hold the left flank against Mysian javelin throwers
Finally the baggage is on the move, Prince Tutak despite having a couple of wounds has come across the battlefield to urge them on, he perhaps more than any recognises the punishment that will ensue if he fails in his task to deliver the treasure.
General Kleitos has moved around the temple with a large group of heavy cavalry, looking to break through a gap and force a way to the convoy. Focussed on his goal and expecting the enemy to flee when their objective has been eliminated. But the Thracian mercenaries have been well paid by King Fartous and they hold the line.
Thracian mercenaries, some with javelins and others with massive swords....they may be noisy and smell slightly unpleasant but you will be glad you paid them well.
As the ambush begins to fall apart, the Mysian Heavy cavalry flees the field, desparate and disregarding his own safety Kleitos decides to charge the elephant, but unused to the smell of the creature his horse is reluctant, recognising the game is up and he is in danger of being surrounded he too gallops from the field.....looking over his shoulder he ponders how to explain the defeat to his king ?
Meanwhile Prince Tutak is now able to regroup his forces and March west to deliver his Kings gift to Iola.

Some two weeks later King Fartous receives a parchment from his sons hand. Having heard of the affront to his honour he is already seething when he begins to read .....
 

Clutching her picture in one hand and the parchment in the other King Fartous rushes out of the throne room......
WE MUST READY THE ARMY !.......WE MARCH TO WAR

Editorial note : to those interested we played with 28 point lion rampant forces , with a bit of dragon rampant thrown in to cover the elephant and chariot, It was a great battle full of tactical manoeuvring, the Bithynians getting blocked in but the Mysians running out of forces to get at the convoy. The scenario is the straight convoy scenario from LR rule book..😀

Tuesday 28 March 2017

Ambush in the Forest : Age of Wolf Campaign :SAGA

The next battle in our Age of Wolf campaign saw the Normans Campaigning, whilst the Vikings were raiding (we have tweaked slightly the selection of battles to give the poor Saxons a rest) we rolled up the random scenario and played one of the new scenarios from the campaign book. The Normans under Duke Baldwin are happily on campaign seeking to quel any local unrest and collect what additional revenue they can find.
The Norman retinue march in column across the British countryside. The woods in the North are home to deer and boar and the Duke is pondering the chances of some impromptu hunting.........
However, there are more dangerous things in the woods.....Ivar the Viking and his retinue are raiding hiding in the trees an 
ambush has been set for the unsuspecting Normans
A scream goes up from the undergrowth, Ivar orders his elite Hearthguard forward to the attack, focussing at the front of the column aiming to hold the column back 
What follows is a tremendously bloody battle and within a matter of seconds (2 turns) the Norman mercenaries are wiped out but this costs the Vikings dearly with a huge number of Hearthguard killed
The Norman knights attempt to break out on the right but amongst the thick forest undergrowth the cavalry is ineffective and they are slaughtered, Duke Baldwin somewhat deterred pulls back to the road. Whilst more Vikings appear towards the rear of the column.
There is nothing for it Duke Baldwin angry and frustrated chooses to attempt to charge down the road to kill the Viking leader, unfortunately his horse stumbles and Ivar supported by his bodyguard unhorse the remaining knights. This leaves the Duke isolated and despite a heroic attempt to escape he is wounded (his second wound in the campaign).
Another fairly minor win for the Vikings.......

Wednesday 22 March 2017

Colonel Cavendish in Zanzibar : Part 3 : IHMN

From the weekend our latest Colonel Cavendish adventure, an utter disaster for our hero....the rescue mission just got a whole lot worse 😀


Monday 20 March 2017

The Black Guard : Crecent and Cross

As well as a couple of games this weekend, will hopefully post Colonel Cavendish's most recent adventure soon, I managed to get a few figures painted up.
These have already seen service in our Zanzibar campaign, but are really for crescent and cross faction, they are Blacktree figures and the first to be completed from the large army I bought a while ago.

Sunday 19 March 2017

Snake Eyes in the land of the Grey Elves : Kings of War

As regular readers know the Dungeon sees quite a range of games on the principle that variety is the spice of life. So we put away my Brits and Germans (back soon) and played a game of Kings of War. The rule set is gradually replacing WHFB for us, it's not perfect but seems to give fun games. John brought his 'grey' elves again determined to seek revenge for the previous defeats at the hands of my ogre army. I never seem to get many photos of these battles, the grey elves being somewhat camera shy !

We rolled a random scenario with dominate being the objective for both sides, requiring us to get into the no mans land between forces and hold it to the end. The ogres with limited ranged weapons and lots of strength needed to get moving so pretty much rushed across the table whilst the elves held back pouring arrow fire and bolts at the oncoming horde. Only the Elven Lord came forward on his massive grey dragon, unfortunately having wiped out the ogre mammoth he strayed too far forward and was caught in the flank by a yeti giant who seized the opportunity for a good meal, I wonder what dragon actually tastes of ?
The bulk of the ogre horde rushing / thundering/ lumbering forward
A giant, a mammoth and a yeti all looking for a good meal, unfortunately the mammoth is eaten by the Elven dragon before the yeti can eat the dragon 😀
The grey horde await their doom
Ogre shooters wrestle to the ground some Kentucky fried chicken
Sadly not enough photos, but what, you ask is the reference to snake eyes all about, well the battle as usual ebbs and flows losing the mammoth early on looked bad for the ogres but then the dragon lord was also taken out. Things were reasonable balanced on the right wing but as we approached turn 6 a huge horde of grey elves charged the Abyssal Daemon in the wood, already heavily wounded 19 plus wounds, he completely failed his nerve test as expected....... but he has the inspiring special rule which means a failed nerve test can be rerolled......and would you believe it the only possible result to keep him on the table popped up out of the shaker.......whilst I deeply sympathise with Johns short lived disappointment I haven't laughed so much in ages 😀😀😀 we had lots of fun, which is what it is all about, and just to assure readers it was John who asked me to record the Snake eye event on the blog, he took it in great spirit. In recognition of their great feat I am determined to get the ogres bases finished off.

Friday 17 March 2017

Albanich 2017 loot

A quiet week working and unpacking from the show, I have also managed to spend some time building Gebirgsjager, but I said I would blog the few bits I picked up at Albanich.

A very modest collection but I was after all running the game. Another unit of Gebirgsjager, a rowing boat for future Harbour scenarios, an excellent last of the Mohicans character set from Redoubt minatures and two small mountain guns to be used for Up and coming back of beyond games, quality not quantity 😀

Saturday 11 March 2017

Albanich 2017 : The Battle for Lympne 1940

Those who follow will know we were at Albanich today. As part of the ongoing Operation Sealion campaign I ran a sizeable demo game. First my thanks need to go to Steve and Martin for helping me run the game, it must be very boring watching me fiddle about with terrain, setting up and sorting things out. But hopefully we were able to put on a good looking game that was also fun to play. Feedback was tremendously positive during the day so thank you to everybody who came across for a chat, your support is very welcome. I also apologise to other gamers at the show I literally didn't get a chance to have a proper look at anything else and I don't want anybody to think the show was just us, lots of other good looking stuff going on 🙂

So on to the game....in previous posts I have covered the background, suffice to say here a strong force of German Fallschirmjager backed up by Wehrmacht infantry and Panzers is seeking to take control of Lympne and the adjacent Airfield. The allies somewhat outgunned are looking to hold a defensive line as long as they can.
The whole battlefield looking from the west, Lympne Airfield on the left, looking towards Lympne itself and the Church of St Stephen, the local Home Guard have set up a rudimentary road block but it is unlikely they will be able to hold the Panzers with their shotguns and rifles, the Allies do have armour in the form of the Royal Tank Regiment and some artillery which is being brought up.
A closer look at the British tanks, pulling off the road to regroup before pushing forward towards Lympne, British regular infantry is moving through the fields towards the church.
The allies are supported by a spitfire from further inland, it is not clear at this stage what impact it can have on the ground battle. The Home guard can be seen manning the roadblock !
A rapid response force of Bren Gun carriers and a single 25 lb field gun are rushing across the Airfield to set up a defensive line.
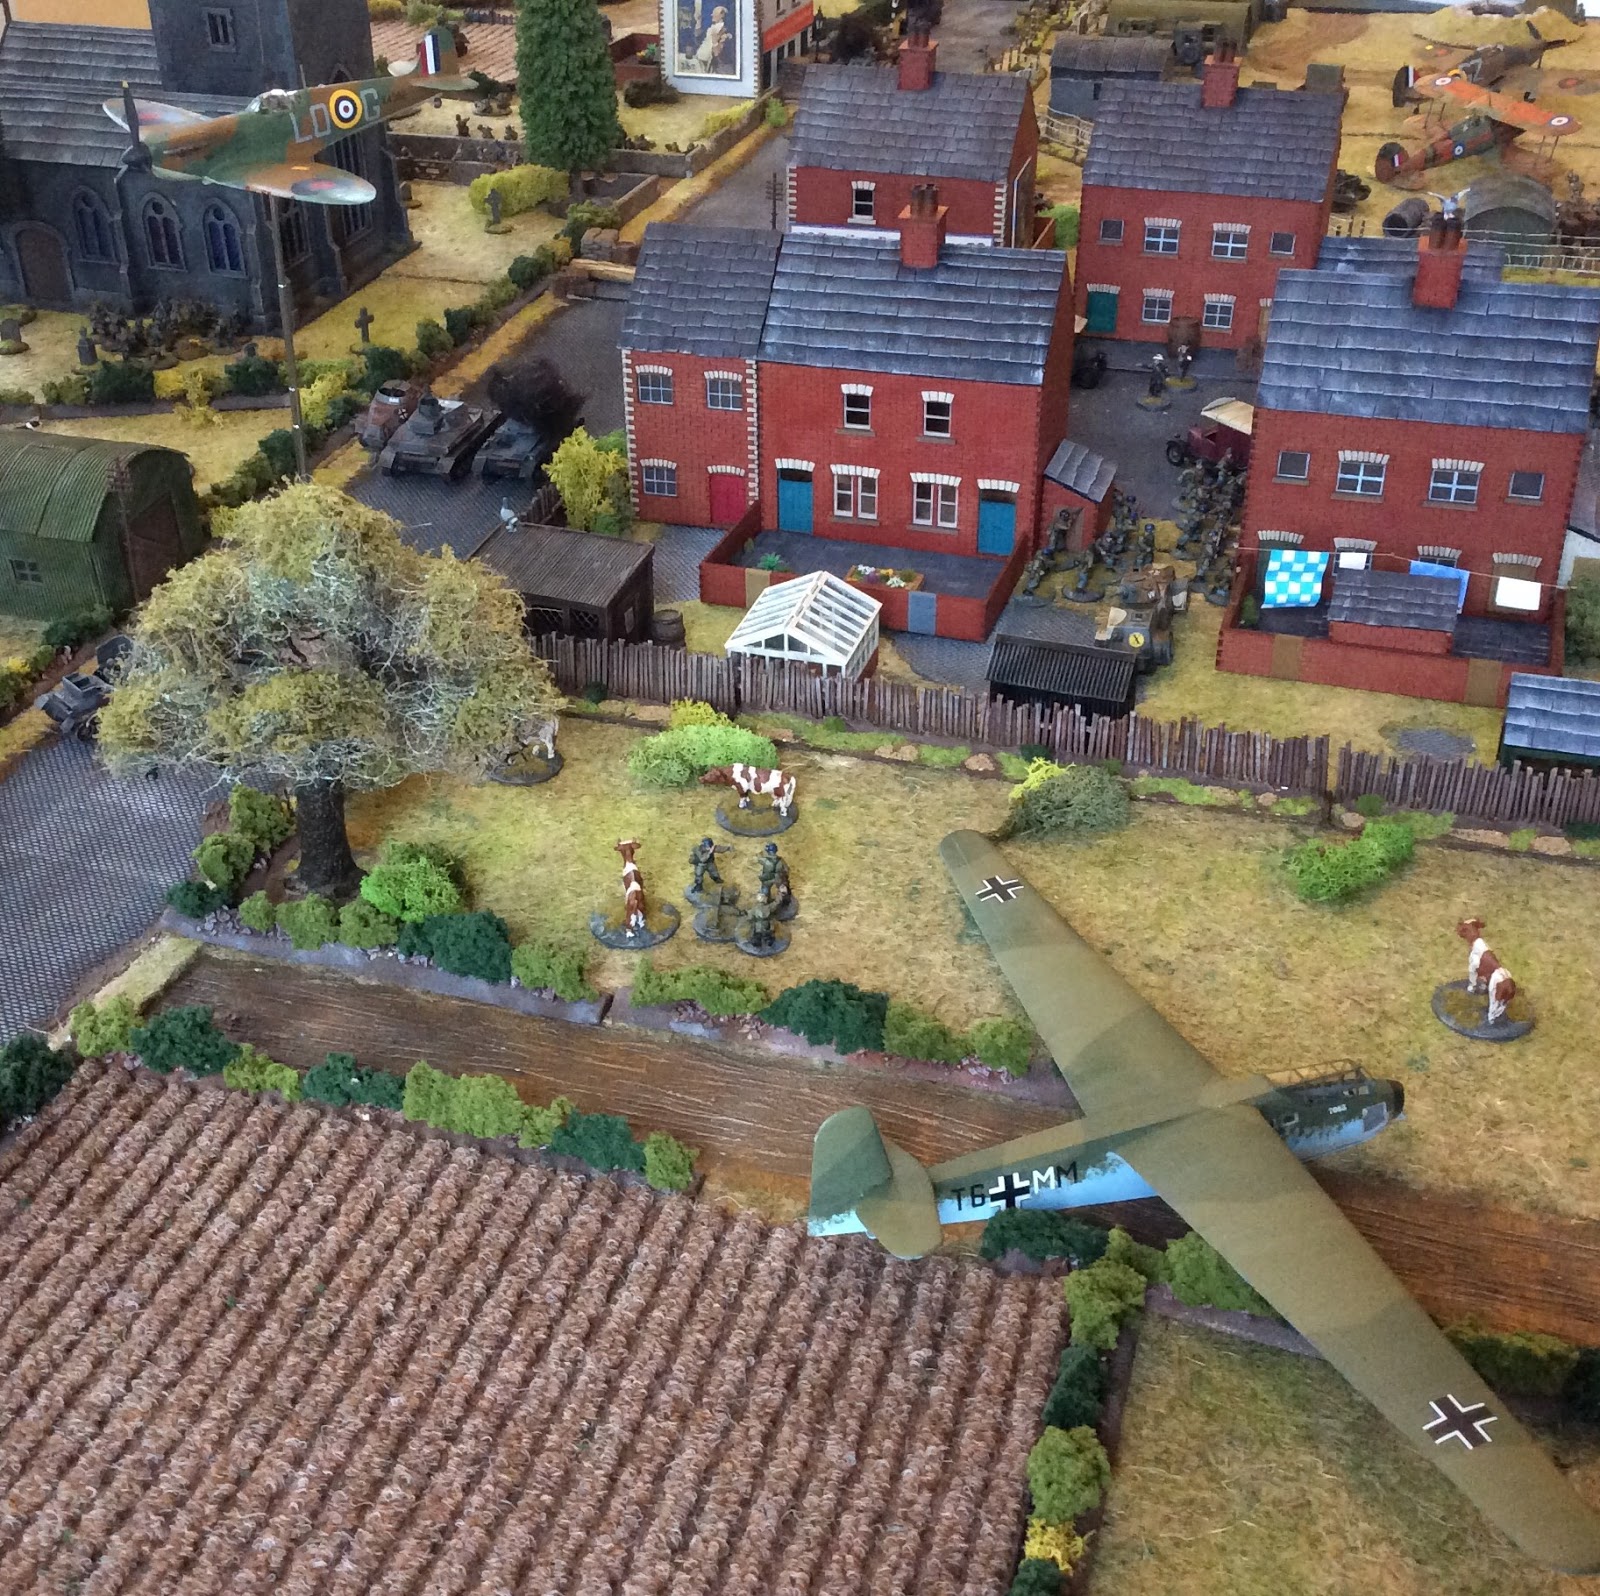
A view from the NE, (for those interested the battlefield is 8' x 4'8")
Fallschirmjager have landed close to the outskirts of the village and are looking to rush through the houses to secure the Airfield 
Kradschutzen infantry and armoured cars speed down the main road whilst Panzers get into formation, the ominous sound of tanks warming their engines
A shot from the SE
St Stephen's Church, the Vicar is urging the church warden to prepare for the worst.
Whilst the spitfire strafes the road the Fallschirmjager push over the wooden fence into the village
The Germans call in air support in the form of Stuka bombers who attack the road block, where the Home guard despite their heroic stand they have no chance !
British infantry are setting up a defensive line close to the church, whilst the RTR looks to break through onto the road.
The Bren Gun carriers have broken down the fence at the far end of the Airfield and the anti tank gun is covering the road.
A period shot of the Airfield 😀
Matilda tanks during the early part of the war were know to be almost impenetrable..........so pushing out in front it has nothing to fear ! Except of course the German Panzerjager 1 which scores a direct hit with its 47mm gun. Kerboom !!!!!!
Luckily it is not long before the allies manage to knock out the Pz II which can be seen burning in the Main Street. Overhead the spitfire attacks the Panzerjager in a futile attempt to knock it out.
The British infantry now seem to have a really strong defensive position, but they have allowed the Germans to capture the church, overhead the Stuka waits to be called in as the German Air observer seems unable to identify a clear target in the heat of battle.
The Kradschutzen have literally raced into the village but become pinned down by the telephone box.
The pilot in the Hurricane desparately attempts to start the engine to no avail there is no getting away.
A lone Gloster gladiator sits on the Airfield surrounded by the battle, if only it could take off !
The Fallschirmjager are now well into the village whilst their advance being covered by mortar fire at long range, but  as usual this is pretty ineffective.
The Home guard have now sensibly abandoned the barricade....but the Germans seem to have lost a little of their impetus and are bogged down in the village or around the church
Another period shot of the battle, a second unit of Home guard who were previously hiding in the pub have crossed the road and are crammed into the pillbox, one can only imagine what that must feel like !
Coming under fire from german armour the Bren Gun carriers pull back slightly, whilst the artillery crew realises they should have done a lot more practice when they could, their rate of fire is fantastic but they simple can't hit anything !
Luckily the German artillery is also pretty useless!
.............but the allies are beginning to feel the pressure, repeated hand to hand fighting around the church has caused them to withdraw, undercover of the swirling smoke the Panzer IV supported by Fallschirmjager has made it to the barricade
At the Airfield a Panzer 38 which had been pinned in a narrow side street has also finally broken out into the open, its armour seems impervious to everything the British can throw at it. This is clearly the signal for the Fallschirmjager to rush forward at the run, the sight of these veterans causes panic in the allied lines.
Some of the infantry starts to pull back rather than be outflanked and the Home guard in the pillbox (and this actually occurred due to a random event) panic and flee at the run ! The British tanks on the road now appear helpless and outgunned !
Another period photo of the Stuka looking for more targets on the airfield whilst the spitfire heads for home ☹️️
The barricade is finally broken down and the Pz IV surges through.
Running low on fuel the spitfire turns for home, the pilot cursing at his inability to hit anything !
The german break through now appears complete, it has cost them both men and material to achieve the objective, but the allies are far from out of the war, they start to pull back onto and around the Airfield to regroup and muster a counter attack. The Battle for Lympne is over but the battle for the Airfield has only just begun ! As darkness falls Lympne is in German hands but they are reluctant to push onto the Airfield without further support.

A splendid day of gaming, it didn't look like the Germans had it in them to break through, but the British had some misfortune, on at least one occasion a random event caused a perfectly well dug in infantry unit to foresake its cover and rush headlong into the church only to be wiped out by the German occupiers ! True to history the allies simply don't have an answer to the better armoured german Panzers. They were unlucky to lose the Matilda early on but when they did the other more obsolete tanks were scarily ineffective.....they need to bring more artillery into play soon !

So a great day, I bought a few bits which I'll blog sometime.......we had fun and it was capped off to my slight embarrassment by our game being awarded for the second year in a row Best Game of the show 😀😀😀