Wednesday 28 April 2021

54th Massachusetts Regiment, an AWI Battlefield, a virtual game and more walking

Hopefully an end to lockdown is getting closer here in the UK the weather has been good so lots of walking but also making some progress on projects. 

So first up a trick trivia question which I posed to Jonathan, given our ongoing American War of Independence campaign I have been reading/listening to some history. This flagged a fascinating fact, given Jonathan lives in the far NW of the states and I live in Cumbria who lives closest to an AWI battlefield ? The answer is below 🙂

But first up the 54th Massachusetts Regiment. I’m not one for sharing political views on the blog but with nearly 200 000 African American soldiers fighting for the Union I have been meaning to broaden my collection to include some African American Units. Having searched on google it is slightly disappointing that they are so under represented in people’s collections. Anyway I intend to change that with two regiments and probably some skirmishers or artillery. I’m not aware of any Cavalry during the war although they became famous afterwards as the Buffalo Soldiers out west, let me know anybody if you know of an active ACW Black Cavalry Regiment ?

54th Massachusetts , Perry figures with the separate head swops they sell for African American troops, a bit of a labour of love as they are quite fiddly. However it does allow you to have some variation in the head position which is nice. I am also building another command base.
Phil invited me to a virtual game at the weekend , your can see much better photos on his blog of his lovely figures and terrain, suffice to say the Saxons didn’t go home with the bacon ! A fun game and good to catch up even if only virtually.
So to the trivia question....of course the answer is I live much closer to an AWI battlefield than Jonathan I discovered the only raid on Britain during the AWI , which was carried out by the famous John Paul Jones took place at Whitehaven harbour. Much of the harbour has been rebuilt in the 19th Century but one gun emplacement remains.
The remaining 18th Century gun emplacement. The first harbour wall was originally built around 1730 and remains in place
The original watchtower and harbour office, together with a period sundial orientated for ships to be able to see it from the dock. Glad to see the Union Jack still flying
As to the raid by John Paul Jones according to the history he chose Whitehaven as this is where he departed when he sailed to America, originally being a Scot by birth. He landed with a small crew and spiked a number of guns in the defences before jumping back on their boats. This is nicely commemorated by the above statue.
and a small plaque, there is a small museum on the harbour but it is currently closed, I suspect few people make a specific trip to Whitehaven harbour because of its connection to the AWI but it is a nice spot to have a coffee and ice cream on a sunny afternoon. We combined the trip with a walk along the cliffs just south towards St Bees.

A beautiful walk along the cliffs
Protected in places due to bird colonies including these Gullimots
With some time off work and the weather good we have also been walking in the hills
Another fly by 
...and a very unusual sun ‘halo’ effect this is taken with no filter this being the refracted light by the clouds

Thursday 22 April 2021

Battle of Great Bridge AWI : Take 2

 After the last Great Bridge battle there were a number of options to give the British a slightly higher chance. With the table still set up I ran through one of these solo to see what happened. In this version the the British artillery rather than being restricted to targeting the earthworks, they were allowed to target infantry themselves and to balance the ‘cover’ effect of the earthworks this was reduced to normal cover.

The battle started as the first encounter with the exception that the artillery immediate targeted the Pickets/skirmishers reducing their effectiveness.
Rather than being wiped out they were forced to evade being assaulted by the advancing grenadiers. The British don’t get it all their own way as the light infantry again fail an early test and are forced back.
The random deployment of the Americans in this battle was harder as both units came on behind the Culpeper Minutemen
Still taking heavy casualties the grenadiers make it to the earthworks and the leading Tories are also able to advance far enough to engage in shooting
The cannon is able to target the Culpeper Minutemen who fail several test and are broken but then rally. They prove much less effective this game
The Grenadiers are again wiped out with their Captain but have been able to clear the first unit of defenders away from the earthworks 
As the American reinforcements deploy the British light infantry have been able to get to the earthworks with the advantage of cover and now the support of the Tories a fierce firefight breaks out. 

After several turns of these units plugging away at each other it was clear that the battle could go either way, although the advantage is still slightly with the defenders. So rather than drag it out I stopped there having convinced myself that with the minor change to the rules the British (still up against it) definitely had a chance in this version of breaking through the defences. One of the other options was to give the British a second unit of grenadiers I may get to try this this weekend ?

A week off next week so hopefully some hobby time although the weather is looking good for walking and cycling 😀


Saturday 17 April 2021

3rd New York : AWI

Quick post on the next completed unit for the American War Independence. These are painted as the 3rd New York I think. I am still just using flags which I have so they are not correct.

These were the second to last unit of metals I pick up in the same job lot back at York show, mainly Perry miniatures but a couple of foundry. The lace trim on a few hats was a late addition as the unit was looking a bit drab. This is partly as I have a new stock of Agrax Earthshade which annoyingly is slightly darker than previous batches.
The weather remains nice and I am determined to be proactive using my Fridays off so yesterday I was back in the hills. Looking south over Derwent Water (the lake)
The bigger hill to the left is Skiddaw
Visited in the morning by the RAF training flight who use this valley to practice their low level flying, the second plane is about 300 yards behind the first, right at the bottom of the tree line.  I am definitely no expert but think they fly Tornadoes from their base in Southern  Scotland.

Thanks for looking....currently preparing some Perry Hessians for painting and they have been a real pain !😥


Wednesday 14 April 2021

Battle of Great Bridge 1775 : American War of Independence

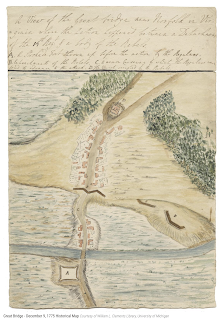
Following the retreat of the British (miserable defeat) at Kemp’s Landing, the British commanded by Lord Dunmore have continued to seek out rebels in the local area. The next significant action worth a battle on the table top took place at Great Bridge in December. Sadly time constraints prohibit me from running through the full history. You can find some details on wiki, I did find this useful map of the action and this information board which marks the location today. Around which I built our small scenario, given the size of this battle it is ideal as a skirmish for an hour or so one evening.

Modern map/interpretation of the Battle from the excellent American Battlefield Trust copied here without permission but perhaps if I can promote a better understanding of this small engagement they will forgive me ? one key thing to note is the marsh areas identified in the period map below has in modern times been replaced by the modern canal, where the causeway would have been back in 1775
Also from the web is this fine period map of the engagement
.
Finally the information board I mentioned sadly I don’t know the location as this wasn’t mentioned but I presume it is located close to the modern day site, all of this means that the British were in for another tough evening. Following the previous couple of battles I ‘tweeked’ the balance to give the British a better chance. The challenge here as with several of these battles is creating a battle which gives both sides some element of chance of victory whilst not losing the essential elements of the historical battle.

As I think Jonathan has mentioned on his blog if in any doubt don’t forget it isn’t meant to be easy to attack a well defended position across a restricted frontage. Historically it provided fatal and a disaster for the British. Special rules in play were all Americans were green so more liable to fail morale and activation tests, American reserves were not able to leave their camps until the first musket shots were fired or until their pickets raced back to reach the earthworks, the British cannons could attempt to break the defences down but couldn’t target the defenders (this is what they did historically) the Culpeper Minutemen were in place at their breastworks from the start and given a longer range due to their superior hunting weapons.
The British cannons open the battle
Rebel pickets have been pushed back, but at this stage the Americans don’t realise a full assault is beginning. The pickets choose to stand and fight.
The British assault led by Captain Fordyce is headed by the light company, all regular British are from the 14th Regiment of Foot
They are supported (reluctantly as it proved) by American Tories or loyalists who like their historical counterparts didn’t initially want to cross the rebuilt Bridge
Choosing not to open fire and trigger the rebel reserves, the light infantry attack with bayonets but fail to break through the pickets
Breaking orders they open fire next turn
The cannons continue to target the earthworks hoping that they will be weakened by the time the British assault arrives across the causeway
It takes the grenadiers to smash through the pickets and this encourages the Loyalist to cross the river
But the head of the assault is a lonely place, Captain Fordyce leads the way, historically he was shot in the knee recovered, rallied his force and led the attack forward only then to be killed close to the breastworks.
Devils all of them the Culpeper Minutemen proved to be enormously effective with their hunting rifles ! Only after they had really caused chaos amongst the British did they start to fail their activation tests
The battered light company and the ‘Tories’ are reluctant to push on ....
And then the remaining grenadiers who have been almost wiped out, caught in cross fire on the causeway break and pull back, Captain Fordyce did survive but perhaps he will wish he had been killed in battle, gaining eternal heroic status rather than face the inevitable court-martial when he gets back to Lord Dunmore
The Virginia loyalists do put up a show of advancing across the causeway but not surprisingly without their leader and the redcoats they waiver and break when they come under heavy fire
Colonel Woodford in the final turn leads some of his successful Virginia regiment onto the causeway, to tend to the British wounded ? Or perhaps collect trophies luckily this unsavoury aftermarth of the battle is lost to history.

Despite the slightly balancing of the odds our game remarkably recreated the historical outcome, no bad thing ? As often happens when the final result is calculated it felt slightly one sided but that wasn’t the case in the heat of battle, the Minutemen were more effective during the key early phase of the battle than they should have been. The British failed a couple of early activations which in a tight game makes a difference. As the table is still set up I might just re-run the battle solo. After the game we debated what might have swung it and I might test it with the British having an additional unit of grenadiers ?

On the weather front it has continued unseasonably cold, bad for cycling but perfect weather for walking so I took the opportunity to get out in the hills, this time around Buttermere in the Western Lake District, the photos say it all really 😀
Looking East
and later on the walk looking south over Ennerdale, a slight dusting of snow

Hope you are all keeping well 👍 as the weather warms up face to face gaming is a possibility in the garden gaming centre (don’t let my wife hear me call it that )


Thursday 8 April 2021

844 Viking Raid on Lisbon

For our battle this week I had promised Phil a game with my Al Andalus figures. Unfortunately for him I have been listening to an audio book on the Vikings, it was Al Andalus with a twist. In 844 a number of raids occurred as relatives of Bjorn Ironside raided down the west of the Iberian Pennisula eventually ending up at Seville (which formed part of a mini campaign some time ago) , so as a one off battle I thought we would play the landing at Lisbon. This took place in August 844, historically the Vikings skirmished with the local Muslim forces for around 13 days before boarding their ships and heading further south. Historical records are pretty sparse that I can find so we have lots of licence to make things up. The Muslim forces were commanded by the governor of the local area Wahballah ibn Hazm. His objective is simple throw back the invaders before they can get a foothold. 

So as ibn Hazm sips his iced tea and no doubt eats another fig/date he is disturbed by the urgent message that black ships have landed on the coast. He has heard rumours of these devils from the North and now black smoke can be seen in the distance beyond the headland. As he rushes to the gates he shouts orders to bring his troops and guards to arms. He will take with him only the fastest and lightest troops knowing that the best way to defeat these invaders is to throw them back into the sea before they are established.

At the beach the Norsemen have already landed from their longboats and jump ashore already armed and ready to go
Sven Ironside (made up) has already led a group of Norsemen upto the watchtower on the cliffs where it has been torched and is already burning
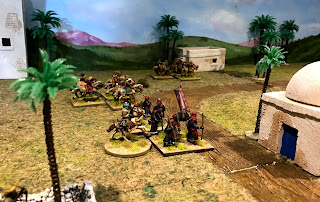
The Muslim forces arrive behind a light cavalry screen
Wahballah leads his forces towards the beach, a mix of light infantry, light cavalry and some mounted crossbowmen
Some of the Norsemen have been taken narcotic substances and are literally berserk,  Probably a bit hot to be wearing those skins ! 
The rest of the invaders disembark 
It wouldn’t be right for the Vikings to hold back so they don’t....
Light infantry move into the Orange grove for protection
Hirdmen and other armoured men attempt to chase down some of the mounted troops but they are successful in evading the wielded axes
ibn Hazm is playing a cautious game 
The berserkers charge into the woods at the earliest opportunity
More Muslim infantry is arriving
Some of the light cavalry becomes dangerously isolated but they somehow manage to get a shot off before escaping !
The Viking infantry charge in....
Whilst ibn Hazm holds the line....these barbarians are stupid all they can do is charge forward !
The Vikings are beginning to become exhausted a combination of the fighting and the hot weather ?
They have battered the Arabs who have taken a lot of casualties but have held together 
The raid is over and Sven flees back to the boats , he will look for easier pickings further down the coast
The last Norsemen are ‘mopped’ up and put to the sword........
A defiant shout from Sven as he climbs aboard his longboat.

We played with lion rampant which gave a good a close game, the Vikings got stuck in but some clever play by ibn Hazm used his mobile to good advantage. He was lucky not to fail many evade tests and managed each time to escape the clutches of the Viking assaults. Nice to play a game with very different troops on each side.

Not much cycling here as the weather has turned really cold, but the weather has been fantastic and with a holiday weekend we have been out doing some lovely walking. Each time I share photos I realise what a beautiful area I live in. With the public holiday we headed away from the Lake District to avoid the crowds and headed To the Pennines.

Looking East towards the Pennines from the diminutive Dutton Pike but it gives fantastic views
A place called Great Asby  Scar just south east of where we live, not only. Some impressive geological features but the structure in the background is thought to be a Romano-British hill fort.
One of the many stone circles in Cumbria dated around 1800 BC
Then back up on the Pennines to a place called High Cup Nick

Luckily all these places are only a short distance from where we live.