Tuesday 30 August 2016

Attack on Siverskaya Airfield : October 1941

Regular readers will know I have a (very) long running air combat campaign based around the war in the air over the Eastern Front. It is not a competitive campaign rather a linear project where the Germans and the Russians alternately take turns in specified missions broadly based on the operations which took place all over the Eastern Front. For our latest scenario (again taken from the excellent Barbarossa : The Air battle by Christer Bergstrom) we have moved to the North and the air Battles around Leningrad.

In an attempt to break the siege the Russian Airforce (VVS) mounted a series of raids on forward airfields controlled by Luftflotte 1. On the 12th October they attacked Siverskaya airfield, with Pe-2 bombers and Il-2's supported by MiG-3 fighters. After a relatively successful attack the Russians ran into the scrambled planes from the airfield but also a group of returning Bf 109's. At the controls of one of the MiGs was Lt Dmitriy Kokorev who up till then had already scored a number of kills, he was sadly killed in the action.

A good set up for the battle. VVS Bombers attempting to kill targets on the ground around the airfield. MiGs to keep off the Bf109s which would come in randomly but no later than turn 6. Each of the planes on the ground together with the fuel dump are targets, we were using my usual amended aeronautica rules.

Snow covers the ground as the VVS attack, Germans have managed to scramble two FW 
but no sign yet of the returning Bf109's. Germans heavily outnumbered at this stage
Those with a detailed knowledge of WW2 Russian aircraft will spot I have had to swop 
the bombers for SB's a deficiency in my collection which needs to be rectified as I don't have any Pe-2's
Russian MiG's fly ahead to clear a path for the second wave of bombers and ground attack aircraft
Bombs are now flying, the fuel dump is ablaze and several planes are trailing smoke.
Out of nowhere the returning Bf109 Rotte arrive to find their home base
being attacked they immediately engage
With planes, bombs and targets all going off or busting into flames the air battle reaches a climax
In the skies above the airfield.

A side shot, at this scale I still haven't been able to find a reliable way to identify altitude, most commercial 
flying bases are just too big for this scale
Eventually with the majority of targets destroyed, and the defending MiG's out of ammo the final
bomber turns to make its way home, we had three more anxious turns with the Messerschmitts attempting to
bring it down which they failed to do, the final shot shows the black smoke billowing into the sky from crashed 
and burning planes from both sides
In the end is was a great battle close as always, two bombers made it back to base and unlike the historical situation Dimitriy was one of the few surviving Russian pilots, with several more kills to his name he is likely to be made a hero of the Soviet Union......until next time😀

Sunday 28 August 2016

Northumberland : Castles, Battlefields, VBCW, CONGO and Operation Sealion

Have been on holiday this past week to lovely Northumberland lots of dog walking, beautiful Castles, sunny weather and some chill out time which allowed me to get some relaxed painting done. In no particular order....

Alnwick Castle always impressive ....have been before but my daughter overjoyed to meet Harry Potter
 
Edlingham Castle c.1400 not far from Alnwick ...didn't seem to be in a very defensive location as easily overlooked by nearby hills. 
Next to a lovely old church.
 
Warkworth .....first time here would like to go back when less busy but they had a medieval combat display which was fun.
 
We also managed a trip to Flodden, since the 500 year celebration they have put in some excellent display and information boards and a really good path around the main part of the battlefield. This shot is taken from the centre of the Scottish position looking towards Branxton and the English.
 
We also visited Etal Castle where they have a reasonable display about the battle 
 
and a tiny, rather tired looking diorama but I always have to take a photo if I see 
figures....it is crying out for a Big Perry type table display !
 
Dunstanburgh, again been before but a lovely walk which ended in Craster eating smoked kipper heaven !
 
And now the painting............. The Congo slaves got finished to add to the Zanzibar figures
 
These photos are rubbish ! But I picked up some WW1 officer figures at Historicon with a view to painting them for VBCW. These two feel like a pompous Royalist General (might change his cap band to a different colour thinking about it) and an Albertine Captain.
 
Two more....again I can be flexible who they fight for although the guy on the right clearly has some Royalist affiliation.
 
Finally with some quality down time........I managed to crack through some Germans for 'Sealion'. 
Three squads each with a submachine gunner, an MG43 and an Officer.
 
A close up of one squad....
 

Saturday 20 August 2016

Sultan of Zanzibar : IHMN

I have finally got round to painting some figures....just seem to have been so busy for the last few months gaming and planning stuff. Anyway sat half finished on the painting table has been the Sultan of Zanzibars' IHMN company. The sultan himself Khalid bin Barghash and his company will find themselves fighting Colonel Cavendish but will also find his way into Darkest Africa in forthcoming CONGO adventures.


Sorry pictures are not great....I also have a few slaves to paint up😀

Friday 19 August 2016

Lunchtime skirmish : LOTR Lion Rampant

We were able to fit in our second lunchtime skirmish this week. This saw Eomer lead a small force of Rohirrim to defend the ford from raiding Orcs and Warg riders. These lunchtime session are a real treat as we explore how to balance games but keep things simple and quick so that the game can be completed in an hour.

With 24 point Lion Rampant armies me managed to rattle through the game......but of course not much time for photos.
Eomer leads his forces either side of the river. 3 units of Sargeant Cavalry, mixed foot yeomanry, bidowers and a unit of sergeants.
Warg riders have already pushed back a unit of cavalry and hunt for further white skins to kill. The mixed yeomanry battered !

Bidowers are not very effective, but with the support of Eomer they have knocked out the berserkers. Eomer has then led is cavalry chased by Wargs right to the edge of the river, which is not crossable at this point.

As the pace quickened I didnt get any more photos. In the end what looked like an easy win for the Orcs, was turned around by the Rohirrim only to have victory snatched away at the last minute when Eomer having failed to kill the Orc captain in a challenge, rolled a double one and fled the battlefield. Now that never happens in the film !

A fun game, lessons learnt keep terrain to a minimum, no more than 24 points. We would like to play SAGA but not sure if we can keep this to an hour ? If anybody has played SAGA in under an hour would be interested to know how😀

Sunday 14 August 2016

The Battle for Gilsland 1938 : VBCW

Those that also follow Martin's blog will know we have been planning a game where our two independent VCBW campaigns could come together. His being based in the sunny NE and mine in wet and windy Cumbria it wasn't hard to devise a scenario.

Following their battle with the Royalists at Brampton (see previous VBCW battle) the 
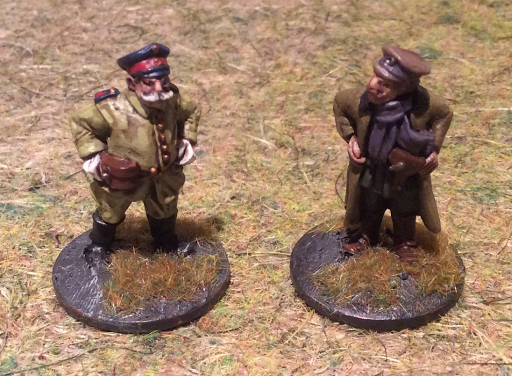
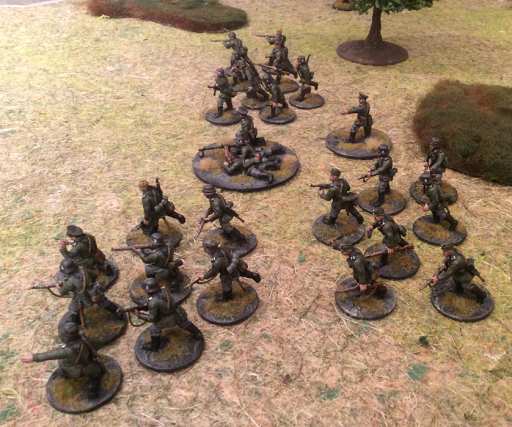
Scottish Independent Republicans have decided to pull back across the border to regroup. Rather than heading directly north they have travelled East to cross the River Irthing at the village of Gilsland. The army under the command of one Captain Hamish McDonald consists of both regular infantry, Volunteer militia troops drawn from the villages in the lowlands, a strong contingent of Coal miners from the Lothian coalfields and an armoured division with solid Matilda tanks, slow but heavily armoured.

A small recon force has been sent ahead to ensure the bridge is open, but having crossed and sent word back to the main force they are surprised by a strong force of Fascist troops approaching from the East. Initially unsure as to their intention Captain McDonald deploys at the edge of the village. As two huge armoured cars trundle towards the cross roads and open fire with multiple heavy machine guns, his troops dive for cover. With the Royalists snapping at his heals he has only one choice to engage this new enemy and push through to the bridge where he can dig in and regroup.

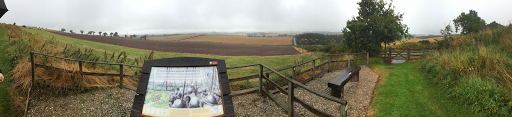
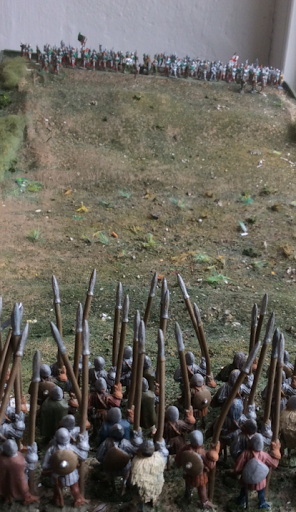
The initial deployment of the Scots, Gilsland village in the foreground, river Irthing is down the hill, more open moorland in the distance. The Fascists are arriving from the East to the right.
Scots regular troops supported by The Duke of Roxburgh, George Ker who has sided with the Independents and is fighting with his summer shooting party, seeing the whole affair as jolly good sport.
The Scottish Artillery attempts to unlimbers under fire, whilst the miners set up their mortar to attack the armoured behemoths in front of them.
More armoured vehicles arrive in the Main Street !
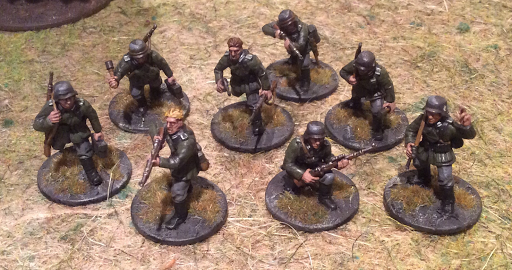
Facing the Duke and his shooting party are a collection of disaffected servants and estate workers. Ungrateful working classes who need to be put back in their place with a shotgun.

The strong central position taken up by the majority of the BUF troops and mortars......luckily they haven't been spending enough time on the range and find it very difficult to zero in on the Scots.
The Scots have a Tiger Moth recon plane carrying a number of 2lb grenades and bombs they do their best to drop these on the armoured cars but can't quite hit the target.
Eventually though the artillery get off a luck shot hitting the first car square in the front observation slit ripping the turret right off !
With the key objective of getting to the bridge the Scots have to advance across the fields to try and get to the road.
The Recon units pull back towards the bridge to hold it for the rest of the army.
In the village the Coal Miners pour fire into the butchers, whilst they can't actually see the occupants by keeping up a solid fire they at least force the BUF to keep their heads down.
The armoured CS9 attempts to push onto the flank but is cautious as they come under fire from behind the hedge.
The BUF have a Hawker Fury attack plane which circles overhead causing even the regular infantry to duck their heads when a burst of machine gun fire rattles down, luckily it doesn't hit much
The Hawker Fury in action...
In the Main Street the Scots have lost a Matilda to the Renault Tank and the heavily armoured car is prowling up and down, the street is not a good place to be in the open !
A shot from behind the main BUF position.
The miners have moved right up to the hedge but continue just to fire into the the Butchers keeping the occupants pinned down.
The Duke's shooting party have made it to the edge of the field and provide support to the Matilda which is temporarily stuck at the cross roads, when it is assaulted by infantry the Duke bags a couple himself...jolly good shot.
Eventually the infantry lays down enough covering fire to attempt to get across the road but you can see they have taken a lot of casualties in the process.
Back in the village backstreets the Miners have come under fire from the tank, boosted by a wee dram of Johnnie Walkers the Miners charge the tank with picks and shovels but soon realise it is too heavily armoured to damage.
The second monster takes a direct hit from the air and busts into flames.
The Scots can now limber up their artillery and make a dash for the bridge.
Whilst the BUF armour prowls slowly around the village with nothing left to shoot at.

We judged it a minor victory for the Scots who were holding the bridge and the Cross roads at the end and able to make a reasonable withdrawal across the river. As night fell Captain McDonald ordered his troops to dig in using the river as a defensive line......" from now on lads this is the Scottish border and we'll nee let any of them Englesh across".

A very enjoyable game and a pleasure to introduce a new gamer to the dungeon....more to come😀