Wednesday 24 November 2021

Prussian Wied Fusiliers and Battleground Show

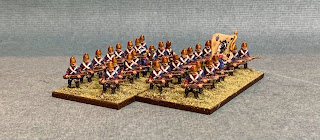
A busy start to the week at work but I have managed to finish off the next SYW regiment

The Wied Fusiliers they seem to have a very characteristic red/bronze hat which you can’t quite see in the picture, but they are a nice sculpts, when I bought a big box of Pendraken Prussians it included several different sculpts and I quite like these ones advancing 
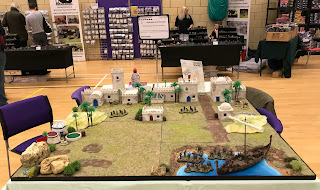
As noted in the previous post I attended the Battleground Show at the weekend. Putting on a small participation game with Vikings versus Muslim in Al Andalus. The picture shows the set up for each game, I thing I played the scenario six times on the day. All seemed to enjoy the experience, what was nice was I was able to link it to the new Lion Rampant supplement A Viking in the sun. I also had a number of lengthy conversation with people about the book, my terrain seems to create some interest and lots of people came to take photos or pass comment, so a good day. I sadly didn’t get a chance to really look at any other games.
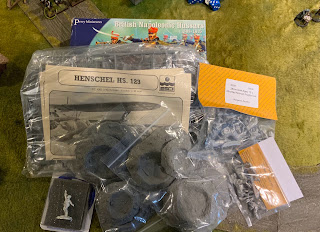
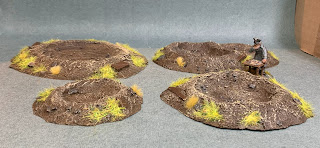
I did rush around and grab some stuff really just to support a couple of traders, picking up a few bits and bobs as above.
The craters is really lazy as I should have made them but they were a very reasonable price from Ironclad Miniatures and really easy to paint up, so we will see these soon on a battlefield. In hindsight I’m not sure about the grass now so that might get scrapped off ?

Thanks as always for looking 👍


Friday 19 November 2021

Fieseler Storch 1/48 scale

Like most of us do I suspect I had a random thought after the last Sealion game about some better objectives in battles. I randomly spent several days thinking about blown up tanks, bunkers etc…. I also thought a downed German officer in his ‘Storch’ might be rather cool, having been blown away with the price of a suitable model I had to wait a couple of weeks then this one came up 👍

This was almost a reasonable price at about £20. 
I don’t have too much patience for models like this really, and the kit was a little too complex for my liking with lots of delicate struts to be placed in the cockpit area ! I just left them out after all it is an objective, it took the paint pretty well as I only painted it with a brush, for a change even the transfers weren’t too hard to fix, total effort about 6 hours over 4 evenings
Anyway despite my fumbling fingers it came out ok and here it is with the officers discussing how they should escape, I’m sure we will see this in a Sealion game soon
Finally I haven’t shared many landscapes recently mainly due to inclement weather and indoor cycling , but I got out today on a blustery and part way up my chosen route this memorial to two local Shepards from the 1890’s any photos taken later when I enter the cloud cover were not as colourful !


Monday 15 November 2021

Battle for Fort Washington 1776

For our next virtual battle, tracking through the history of the American war of independence we have the battle for Fort Washington. 16th November 1776. One of the great joys of this project is learning more about the AWI especially about these smaller less well know battles. Once again I will only provide a shortened history if you are interested in more search the web. Anyway having fought the indecisive battle of White Plains the American forces were encamped on the heights at Fort Washington over looking the Hudson River. Suggestions were made to evacuate the fort but these went unheeded, general Howe perhaps remembering the outcome at Bunker Hill decided to go ‘full on’ to take the fort. The complex planned assault would take place from three directions with a fourth feint attack as well.

Despite being a smaller scale battle there is plenty of information and some useful maps. However, it is perhaps a difficult battle to gain a balanced scenario as the Americans were very significantly outnumbered and pretty much on the back foot.

A very nice period picture of the Battlefield from the north
There are several nice old maps of the battle and I suspect the full battle would make an interesting and larger battle given space and troops, you could even include elements for the British ships which were engaged in the battle
However, given my space and collection limitations I focussed our battle mainly around the Hessian assault under Knyphausen and the flank assault under Mathew/Howe. 
This converted into the battlefield above before the troops were set up. This would give an interesting battle for both sides, the Americans would be spread out and face the choice of pulling back to the fort to defend or picking off the advancing troops as they attempted to close. We decided that victory for the British/Hessian forces would be eliminating over 2/3 of the Americans or getting into the fort.
The Hessian forces prepare for the assault, here they are using Dyckmams Bridge but historically they were taken I believe over by boat.
Margret Corbin with her husband on the heights with Maryland and Virginia Riflemen
Gen Magaw in the Fort with Bucks County Militia
The Americans also have a number of small skirmish units amongst the defensive works and some Pennsylvania Volunteers on Laurel Hill. The only other scenario detail of real worth is the British contingent will only arrive on a random die roll, to represent them being delayed by the tide historically. As we have seen in previous battles attacking can be tough so the allies have about a 3 to 2 advantage in numbers. Would this be enough ?
The Hessian jägers immediately open up with a volley and cheer as the first rebel unit is forced to pull back
The rest of the Hessians fan out
A second volley from the jägers …hoorah 
The Maryland Riflemen look on with grim determination they may prove a tougher nut to crack
Hessian grenadiers are now pushing upto the first defence 
The rest of Knyphausen’s command is pushing up the valley towards the south
After turn three the British would roll to test for arrival and luckily they came in turn five, they immediately push their skirmishers forward who start to fire at the Pennsylvania Volunteers 
Battle now widespread and the allies are making good progress
Then suddenly the British have a dreadful turn, failing to activate and their assault on Laurel hill stalls allowing the rebels to bring up some additional defenders
The Maryland Riflemen have pushed forward feeling the moment has come to take the battle to the Germans
But still progress is being made even if the Germans are getting slowed down
Margret Corbin (you’ll have to google it) fires another blast, the American artillery on the ridge is very effective
A sense now the german attack is stalling but hopefully the British are now starting to get moving 
The light infantry blast away at short range
Finally the allied cannon is able to open up to some effect driving the Maryland regiment back
A glimpse of hope the British grenadiers easily push through the earthworks
The hessians now waiting for their moment to renew the assault
Driving the skirmishers back 
But Magaw has lined up his Regiment across the ditch and the grenadiers are exposed
The British combined light infantry somehow manages to fail to chase the American skirmishers away
The Americans have started to pull back and the allied gun falls quiet
The final nail in the British coffin, a tremendous first fire volley into the Grenadiers over the road/ditch. In one turn the British grenadiers are decimated 
We called the battle here, the allies just don’t have enough fire power to push forward the assault and the Americans have started pulling back to the main fort defences. The Americans win, which in this case means they have enough time to evacuate the bulk of their forces rather than surrender them which is what happened historically.

Once again a very fun battle, a couple of key turning points when the British stalled early on and then when the British grenadiers were wiped out. We discussed the balance of the scenario and came to the conclusion that on average the attacker needs a 2 to 1 ratio rather than the 3 to 2. It would be fun to play this one again with that extra balance ? Of course we won’t be implementing this balance until after Trenton ! I do think Fort Washington would make an excellent larger battle as long as the victory conditions for the Americans are achievable. Buying time to escape.

Thanks as always for taking the time to scroll through 👍

Matt


Sunday 14 November 2021

18th Century Dragoons and Infantry , Battleground Show Stockton

Not sure why but I seem to have fallen into painting both SYW and AWI figures at the same time. Mind you I was doing early war tanks a couple of weeks ago. Anyway a couple of units completed in the last week or so. Some small some larger…..

A third unit of Prussian Dragoons, really the only notable thing about them is I painted 16 rather than the normal 15 and didn’t even notice but six fit on a base as well as five 
With our next AWI battle scheduled for this evening (depending on the NW American storms?) I needed to crack on with a few more hessians this regiment is a bit of a polyglot but they look ok and will be playing as various units anyway. The flags from GMB really are nice so I want to get some more from them in the future.
I am attending the Battleground Show in NE England next weekend putting on a small Demo/Participation game. This is focussed around the various raids by Vikings into Al Andalus between about 800 and 1100 
Really it is a chance to get a quick and fun game on the table using lion Rampant rules
It coincided with me seeing this new supplement so I ordered a copy which gives it some nice context.

If you are a follower of the blog and visiting Battleground at Stockton do come over and say hello, I’ll either be 
playing or perhaps shopping ?

KBO Matt 👍


Sunday 7 November 2021

Battle for Rhodes Minnis : Operation Sealion

Following the failure of the British forces to retake Lyminge they have pulled back to a defensive position along the West Woods. After a brief respite the Germans are actively probing the defence line with a view to breaking through to Canterbury at cutting the bulk of East Kent off. This would create a secure foothold with adequate harbours at Folkestone and Dover to build up forces before pushing the offensive towards London.

Our battle sees a German reconnaissance force probing towards the woods through the village of Rhodes Minnis, some of the British forces from Lyminge have managed to regroup and have been joined them. Including the Rhodes Minnis Yeomanry a mounted force who have been keeping watch in the area over the last few weeks.
A map showing the battlefield and its relationship to Lyminge. The blue line is the nominal British defence line, but it is likely this is broken in many places. White the optional German advance routes
After the furious fighting of day one a Spitfire has crashed into the edge of the woods (no specific game play for this other than to designate the woods as one of four objectives)
The Rhodes Minnis Yeomanry scouting at the edge of the woods.
The Crossroads at Rhodes Minnis itself a lone German outrider leading the way 
Quickly followed by the main German force.
Overview of the battlefield, Germans must enter along the road from Lyminge, British enter from anywhere top right corner. The red dots indicate the four objectives. Which must be captured and held.
British regulars supported by a MKIV Cruiser massed near the pub
The Yeomanry move into the woods to hold the crashed plane objective
All the German force is fast moving and all infantry mounted in vehicles they immediately split their force off the main road. As the British have set up a 25lb artillery piece close to the northern crossroads
More British infantry enter by the pub
The Germans also have artillery set up on the road and a RAD8 but it has been pinned down by the Bus.
They don’t get much game play so another shot of the Yeomanry 🙂
The Germans come under fire from the British tank so quickly jump out of their vehicles
They are also moving to the left heading for the woods
Just in time the second unit leaps out before their transport is blown to pieces
The Rad has pulled back left to force a British Bren Carrier back across the field
The Germans are now closing in on the woods
The British holding the northern cross roads in force, but it will need more aggressive tactics to claim a victory. At this point we both became rather obsessed with the Breaverette it is such a crazy and quirky piece of British nonsense. Initially it is used to spearhead the British counter attack !
The last of the German infantry are now moving up around the stables
A significant push towards the West Woods objective
But the Germans have realised that they are running out of time and aren’t technically holding their own objective, the pinned unit by the burning Hanomag fail two activation rolls  !
The Germans are finally in the woods
The second unit leaps over the fence and assaults the Beaverette they manage to immobilise it 
The German officer drives across to get he infantry moving !
By now the battle field is littered with burning vehicles, a British Vickers is burning in the road, two of the Hanomags are on fire and the Bren Carrier and Beaverette are immobilised.
But the Cruiser is still blasting away and attempts to contest the road raid shelter objective, it can’t quite get close enough
Finally the Germans get back to the crossroads.
Dismounted now the Yeomanry are fighting hard in the woods which are still hotly contested

A very fun battle played in good spirits. Technically it was a draw but we agreed that wasn’t quite a definitive result so we played the extra optional turn and the Germans then managed to get back to claim the crossroads. Importantly the Beaverette whilst immobilised survived to fight another day, perhaps I should get a fleet of them ?

Thanks for looking 😀