Showing posts with label Peninsular War. Show all posts

Saturday, 9 August 2025

Battle of Reichenberg 1757 : SYW

It has been a while since we played with our SYW collections, we have fought the majority of the larger Prussian vs Austrian battles so we are now exploring some of the smaller battles. The battle of Reinchenberg on the 21st April 1757 was part of the Third Silesian War. The battle involved a corps or so on each side, the Prussians commanded by Marshal Von Bevern and the Austrians were under Count Konigsegg.

The two armies were marching somewhat in parallel when the Austrian took up a defensive position close to the town of Reinchenberg, but when they came under serious pressure they chose to pull back giving the victory to Bevern who captured a significant amount of Austrian supplies.

A couple of useful map from the web

Martin had set up the battle, the Austrians holding the two emplacements on the higher ground. The objectives for the Prussians are to take the high ground and if possible cut the road and thus trapping the Austrian army.
The Prussian left wing prepares to assault the high ground
Both forces have their centre dominated by cavalry, the Prussians seek to block any Austrians crossing the river
On the Prussian left wing they are assaulting the earthworks on the high ground, the Prussians have split their cavalry who have then been able to turn the earthworks and support the assault
On their left the Prussians have a tougher job, fighting up hill into defensible earthworks !
The rest of the Prussian cavalry has been thrown back from the river, but luckily reserves have arrived to strengthen their centre
After a hard fight the Prussians have forced the earthworks on the left, but they don’t have enough strength to push down the hill to the villages on the road
The Prussian cavalry has regrouped in the centre and their reserve infantry brigade prepares to cross the river and drive the Austrian cavalry away
On the Prussian right, the earthworks have been taken but at significant cost and when the Austrian reserves arrive they can’t hold onto the objective
Prussian reserves crossing the river
They drive the Austrian cavalry gradually back towards the road
The position at the end of the battle the Prussians have snatched a victory having taken and held one earthwork and cut the road. The Austrians have retaken the second earthworks, with the Prussian right wing pulling back to a defensive position.

A great battle and it reminded us how much we enjoy these SYW battles and we are now searching out some more for the future 👍

Also managed a bit of painting this week completing some KGL Hussars for my British peninsular army
This gives me two units of Hussars for the British which is enough, I certainly don’t enjoy painting Hussars way too much lace and bits. These will have to do and are ok if you don’t look too closely.

That’s it for now thanks for checking in this week

Matt ❤️


Monday, 9 June 2025

Peninsular Battle and painting update

With posting our St Mere Eglise battle to hit the 6th June I missed a quick battle from earlier last week and some painting updates.

A couple of guys who recently visited the dungeon were keen to have a go and Valour and Fortitude as a ruleset they had not played so I set up a small battle early last week. In the end I only had one visitor but we were still able to run through the battle/rules pretty easily.

Three infantry brigades each side with some limited artillery support, I left cavalry out this time to help simplify the rules
We weren’t taking it too seriously so the French just went for it, pushing across the table using some convenient fate cards allowing them to turn the British left flank.
After several turns the French had their noses in front although several of their brigades had taken quite a beating, a fun battle and good company for the morning 🙂

I’ve managed a bit more time at the painting table this past week.
First up the final Italian infantry unit, I was keen to get them finished so we can play them in the next few weeks. These are the metal warlord figures, picked up of eBay for a reasonable price, slightly smaller than their plastic counterparts, but they do add a little variety.
In the spirit of finishing things off I also had these ‘Ashigaru’ , I’m still not very familiar with Japanese troop names ? These being armed with bows. They are Warlord plastics which I picked up as a huge  (very cheap) army box, before I then amassed a load of Perry figures second hand. I thought I would at least try putting a unit together, they are not the best but if you can avoid the overly static poses they are not too bad. Also not my best painting.
Given that they are fairly pleasing to the eye ? And scale wise they fit fine with the Perry’s

Enthused I might prep up another Samurai unit this week.

That’s it for now, hopefully another couple of battles this week and a parcel on the way form Warlord games which should be arriving this afternoon 🙂

Thanks as always for checking out the blog 

Matt ♥️


Sunday, 4 May 2025

Battle of Bussaco 1810 : Peninsular War

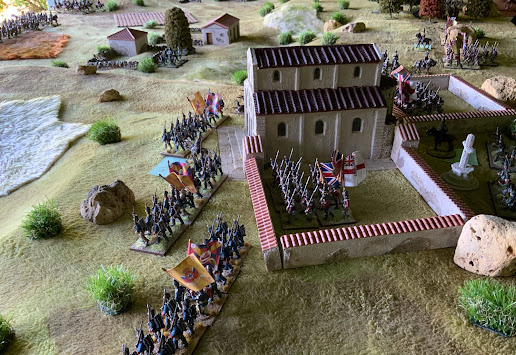
With the British weather warming up it was time to venture into the Garden for a larger Napoleonic battle. A chance to get as much of my Peninsular collection on the table. Bussaco is regarded as one of Wellingtons classic defensive battles holding the ridge with his outnumbered army held back as long as possible on the reverse slope, the French sending colomns up the slope only to be beaten back. Having checked out the Command and Colours scenario I felt I could just about do justice to the French attack by Ney on the British/Portuguese left wing. This is also the most famous part of the battle with Craufords light division defending the Convent on the ridge.

Lots of available information on the battle, this map particularly useful. Obviously many adjustments were made to fit my collection and the practicalities of terrain.
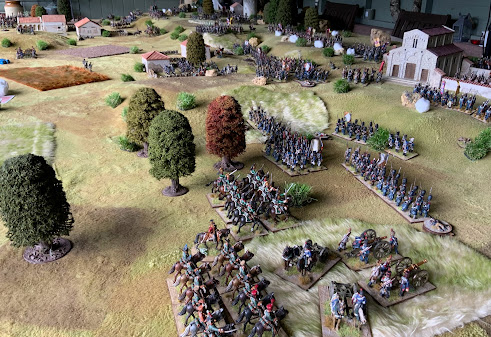
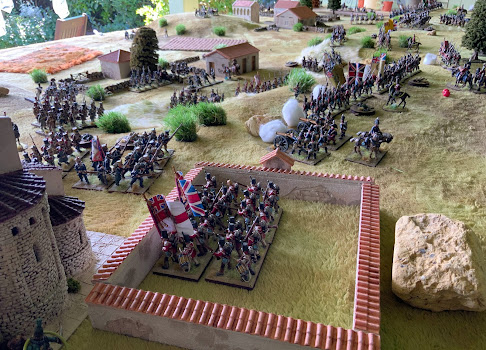
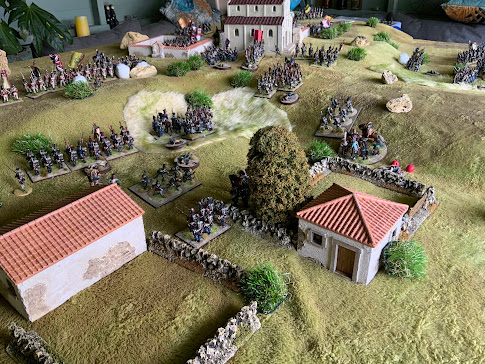
The battlefield setup, 12x6 feet. Convent in the foreground, the village behind representing Sula and beyond that Moura. To give the battle any sense of authenticity the slope has to play a part, this immediately makes it a very tough battle for the French, who in hindsight would never of attacked. However, to try and represent this any troops moving up or ‘down’ the slope would have to be in open order and would take a turn to reform on the crest. Cavalry would have to dismount to move up the slopes. Finally if the British were more than 12” from the crest they couldn’t be seen or shot at (but they could also not shoot). Finally the french would have one ‘brigade’ in reserve who would arrive one the draw of a card.

The light division in the convent, with a Portugese brigade push out in front
Maucune’s Brigade moving through Moura, with some supporting cavalry from Junot’s Division
Loison’s Division in the distance and in the foreground Marcognet. The British have a small number of Riflemen in Sula to slow the French advance. The cavalry behind Loison represents Lamothe’s Cavalry but will really not be much use although their artillery might help ?
The french begin their advance
Much of the British line is holding back to avoid being hit by french artillery, (note the Windmill is anew addition to my terrain the Rendra version picked up at Salute fits perfectly now painted up)
The nearest part of the ridge to the french is in front of the convent so the French use this to try to get a foothold
The 95th stubbornly hold Sula
The french have made the ridge and are now sparing with the Portugese and light infantry sent forward by Crauford
On the french left the generals are realising the error of their attack with troops having to form into open order and the finding themselves at the top under fire while they try to reform or fire back, (luckily they are only toy soldiers who can go back in the box)
Better progress towards the convent with the 60th Rifles driven off, annoyingly the British pass all their Fortitude tests
Finally Sula is taken and the french can punch on towards the slope itself
Some of Junot cavalry has dismounted to support the attack on the left, but the British rise up, deliver one volley and Charge with the bayonet driving the leading French back down the slope.
Massed french is now trying to push towards the convent but are restricted by the width of the ridge here
On the french right the cavalry is useless and the infantry has now chance against one of Cole’s British brigades who pull back behind the ridge to avoid the french artillery.
The Portugese however take a real battering in front of the convent
They are driven back but once again the British pass a key fortitude test which would probably have seen the rest of the brigade flee the field
A wide shot just to show the fun we were having 😀
In the centre the french try yet again to force the ridge but are met with the bayonet, the French eventually win this single combat but are too shaken to advance any further
The leading French are now pushing close up to the convent but the rest of Craufords Light division are still holding the ground
This was really the end of the battle. The British have held the centre quite easily, with all the remaining french units heavily shaken and not fit for another attack. The convent is still being contested but really only the Portugese brigade has been badly mauled.
On the french left they have been driven back with great loss ! So a win for the British. A throughly enjoyable encounter, great to get the collection out and fighting. The french reserves never arrived so Ney will be having strong words with their commander. In the end we judged the rules we had in place for the hill felt harsh but were about right. Had the reserves arrived early perhaps the french could have wasted even more men trying to get up onto the ridge. Looking forward to some more Peninsular battles soon.

This past week I also went down to George's to complete our Konigsberg campaign. George has already blogged so not a blow by blow account here, just a couple of photos to show his lovely late war collection in action.
Germans advance in strength
Despite losing my Pz lV early on the Germans eventually got the upper hand mainly due to numerical superiority and firepower. We didn’t hold back and after a wobble where the German morale started to drop worrying quickly, we managed to turn things around to claim the win in this final battle. 😀

and finally the weather has been crazy hot and I managed to get out into the hills
The central Lakeland mountains in the sun

That’s it for now, I’m away again next week to Scotland but then planning to attend Partizan so let me know if you are attending. I’m hoping to take my Spanish with me to Scotland to get them stuck together at least.

Thanks as always Matt ❤️


Monday, 17 February 2025

Battle of Corunna : 16th January 1809

Mentioned on one of my previous posts we played the battle of Corunna, a good chance to get the Naps out for their first battle this year. Obviously a very famous encounter from the Peninsular War. But also a large battle. Using John Sutherland Scenario book and with a bit of licence I was able to cover most of the battle. Effectively each Battalion or unit is the equivalent of a Brigade historically. (The editor I previously  used for doing my blog posts seems to have stopped working making it more annoying to post so the test will likely be even shorter than normal)

A map showing the lead up action to the battle, basically the British are being chased by the numerically superior French and looking to escape. The grim winter forced march cost many lives and as the British approach their fleet at Corunna they were pinned by the French under General Soult.
A period map of the battle 
The essence of the battle setup up is the British hold a series of low hills protecting the town of Corunna. There are three main villages Elvina, where most of the fighting took place, Piedralonga and Oza slightly to the rear of the British line. The British are outnumbered but they need to hold the three hills. We had a couple of scenario designs features. Given the huge numerical advantage we gave the French some command issues and brigades would fail to activate on a 1or 2. Historically Sir John Moore was mortally wounded during the battle so so if any units took wounds from firing within 12” inches then each turn a check would have to be made to see it he had been wounded.
Looking down the French line in the foreground the French light cavalry, Elvina in the centre of the battlefield
From the other end the thin line of British defenders
Hope’s Brigade looks particularly isolated !
British reserves under Paget
As the battle starts with some preliminary artillery fire from the French would you believe it second turn John Moore fails his wound test and has to be carried from the field 😂 we then allowed Hope to take over as I believe he did historically leaving his brigade on the British left
The french fail a number of activation tests at the start, the cavalry seem reluctant to get moving
Eventually the french massed columns get moving towards Elvina
The British reserves start to move forward as well
The British invest the village of Elvina
But a small detachment of french light infantry get into the small church, the British guards charge forward to through them back out…
The British reserves now pull up onto the ridge
The french start to surround the village
Despite the ferocious charge of the guards the french hold the church and the British are in danger of being outflanked
The french are pushing into the village, but the small stream and the defended terrain hamper the advance, the British fight tenaciously
The french now push around Elvina making for the ridge
But they are held back on the left
On the far right of the french line it has taken ages to force their way across the stream under fire and they can’t close with the defenders
British light cavalry from the reserve charge across the ridge catching some of the French in column
And on the left the french cavalry finally get a charge in but make little impact
The french are now pushing onto the ridge and through Elvina
And finally on the french right they break across the stream and the heavily outnumbered defenders of Hope brigade start to break, true to form only the Highlanders hold
The fight for the ridge, the British desperate now, throw the already exhausted and shaken foot guards into to combat
The french have captured one of their objectives the hills at the back of Peidralonga
The french though have failed to make any impact on the left, again true to form the broken ground has prevented the french cavalry making any impact
In the centre the ridge is being contested although the French have taken the village. At this point we came to our time limit. It felt pretty much like a draw although perhaps the French have the advantage and are still pushing forward.

A good battle and nice to get the Peninsular collection out on the table. I was keen to see if we could recreate larger battles with some sense of scale and this seemed to work out ok 👍

A bit of painting this week mainly completing italian forces for Sicily
Two captured French tanks handed over to the Italians by the Germans. A repainted R35 and an R39
An M13/40 Armato light tank, you will note nones of the tanks have any markings this was because I couldn’t find the decal sheet, but it finally turned up at the weekend so I will apply a few markings later
And the Italian infantry who were partly painted, four squads of infantry. A mix of uniforms as they had supply problems at this point in the war, the Italians saw combat this weekend but more of that later ?

Thanks as always for popping by, only three battles to catch up on now 🙂

Matt ♥️