Sunday, 12 December 2021

The Battle of the Lakonian Plains : Blood in the Sand

As the dawn rises on the coast of Lakonian, the sea mist gradually rises from the dunes and hills inland, the Roman force can now see troops lining many of the hills beyond the flat coastal plain. Consul Martinus contemplates his position if only the mercenary Gauls hadn’t been lost in the storm, no matter they may have landed somewhere else and be heading this way in support. In the meantime he has an enemy to deal with.

A few small technical details of the scenario before the battle begins. The Lakonian forces were entirely hidden during the Roman deployment with only the rough location of troops available. The Gauls will arrive at a random location sometime after turn three. If they get into combat but become disordered there is a chance they will swop sides. The sides were broadly the same size but there were significant differences. The Romans predominantly Heavy Warriors (with extra throwing spears) they are supported by a significant number of Numidian Mercenaries. The Lakonians have a small number of elite Spearmen, mercenary light cavalry, three large block of City-state spearmen and significant numbers of light tribal skirmishers and slingers. We didn’t really set a specific objective it was clear one side would have to break before darkness.
Local city states have sent huge numbers of spearmen to support their Lakonian neighbours, quantity over quality !
Tribal skirmishers run towards the battlefield
The Numidians , agile and aggressive horsemen and light spearmen
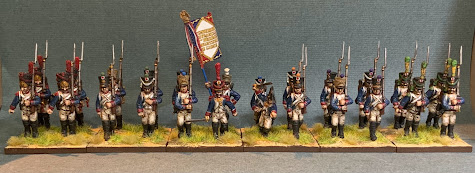
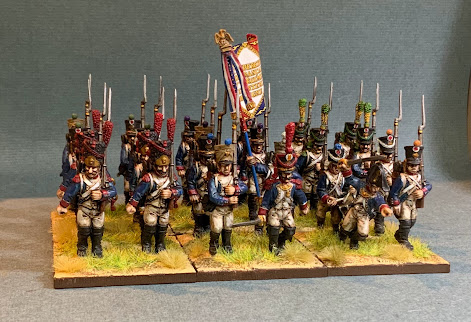
The core of the Roman army blocks of heavy warriors.
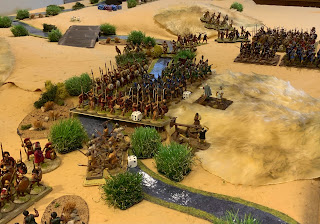
The two lines begin to move towards each other
In the distance the Greek light cavalry gets the better of the first engagements but they don’t have much room to move trapped against the sea, in the foreground the tribal skirmishers move into the difficult ground around the stream
The Numidian horse gallop forward to throw their javelins agains the slingers on the hill
The Elite Lakonian Royal Guard March in tight formation down the hill it will take a lot to scare them
Skirmishers start to annoy the Romans from the flank but for the moment both sides are reluctant to charge forward
Finally the order is given to close
The Lakonians have pushed the Numidian infantry right back, but they are tough fighters and it isn’t an easy win on this flank
The cavalry battle continues on the far left although agile the light cavalry starts to get worn down and picked off
A huge clash of arms spears but the city states come off worse with some very poor morale rolls and they are momentarily brought to a halt and pushed back
They miss a crucial turn of combat whilst they regroup and the Roman heavy infantry makes the most of it.
The majority of the Numidian cavalry has been driven off but it is taking too long to drive the infantry away
The Lakonian Royal guard has forced its way across the stream to hit the Roman centre, but somehow the Romans stand against the onslaught
Finally the Numidians are being worn down
In a matter of a few turns the huge spearmen blocks from the Greek city states on the left wing have been crushed and then turn and flee the battlefield. There will be a reckoning  for this cowardly action in the future.
Only the light hill tribes can now contest the centre ?
The Royal Guard have fought a desperate battle across the stream, many of them have fallen under the watchful eye of their King 
The Numidians are finally cracking but Lakonian troops on this flank are too far away from the centre to provide support
Cornered and fighting to the last man the Last of the Royal Guard are butchered turning the stream red with blood
At this point with the battle almost won the Gallic cavalry arrives, were they delayed, or were they deliberately hiding to see who got the upper hand….they are not to be trusted !
The rest of the Numidians are finally put to the sword but it is too late
The Romans are holding the centre in force with only light troops attacking them from the edges. Several Roman units are destroyed this way, lost in the difficult ground around the stream and then pelted with stones, darts and javelins but it is not enough to swing the tide
The Romans have the manpower to grind the defenders down
King Anaxander has been actively engaged in combat most of the battle killing Numidians with gusto, however with only one unit of Lakonian infantry left and having been abandoned by the other city states he has no choice but to capitulate. These Romans have been a formidable foe. He flees the battlefield amongst the carnage…..only the future will tell what sort of reception he gets on his return to the capital !

An enjoyable game and a chance to get lots of our ancients figures on the table. It was always going to be a tall order for the Lakonians who were outnumbered slightly but also overpowered by superior troops. The Roman infantry were particularly strong and in significant numbers but battles are seldom equal affairs.

Thanks as always for looking 👍 Matt


Friday, 10 December 2021

The Battle of the Lakonian Plains : Blood in the Sand Campaign

Following his ignominious defeat in Lycia Consul Martinus of the fledgling Romanus State was forced to return home empty handed. On the depressing voyage across the Aegean Sea he sailed close to a number of islands which showed little promise of future plunder or expansion. However, as his small fleet sailed around the coast of what he believed to be the mainland he spied land where inland from the flat plains the land seems fertile and actively farmed. The men working the land appeared not in the least warlike and submissive. On his return home he was lucky to escape with his neck having squandered much of the finances he had been given for the previous expedition. Using less than subtle methods he persuaded the state leaders to permit him to lead another expedition to the area he had seen. The following year his ships set sail stopping first in the north where he was able to persuade a tribe of  fierce Galician horsemen to join his force this on the promise of easy pickings and plunder. His growing force then set sail for the south and the land he had seen. Due to bad weather and storms the ships carrying the Galician horsemen was separated from the main force. But no matter Consul Martinus would land anyway and hope the Mercenaries would arrive to support his invasion.

As his ships turned the last promontory he saw an ominous statue looking out to sea, somehow he hadn’t seen this the year before. The beach seemed eerily quiet as he disembarked his forces but he had a sense he was being watched.


Amongst the low hills that surrounded the beach King Anaxander of Lakonia watched in silence, his scouts had warned him that the invasion force would be arriving and he had hurriedly pulled together a force to prevent the invasion. Uncertain of the size and nature of the enemy he had called in support from local city states and nearby tribal horsemen. No matter the size of the enemy he knew his small core of Lakonian troops would rather die here on the battlefield than suffer the disgrace of defeat. After all his wife had told him to “come back with his shield or on it”. It would be his greatest honour to die this day in battle  HA-OOH

Those of a delicate historical nature should avoid this Blood in the Sand battle or they may suffer a nose bleed or other ill effects. But rest assured no elephants will hurt during the battle 🙁

Tuesday, 7 December 2021

Battle of Trenton 1776 : American War Independence

The next battle in our ongoing campaign is Trenton which took place on the 25/26th December 1776. Unlike our campaign the Americans had been doing badly and Trenton although a fairly small engagement was a huge moral boost. Famously Washington took a huge risk crossing the Delaware river in difficult icy conditions. Then set up a quite complex battle plan splitting his force to attack the unsuspecting Hessians encamped in the town of Trenton. The plan was the Hessians would be drunk from celebrating the festive season so caught off guard. In fact the weather was so poor nobody expected an attack. Significantly outnumbered the Hessians initially put up a stiff defence but when the escape route across the Assunpink Creek  was cut off they surrendered. There is plenty of info on the battle including some splendid maps including the period one below

There are also some good explanatory maps of the action
and here is Trenton scaled down for our table measuring about 4’6” by 6’ I have squeezed in the essential features the two American brigades will enter as shown

The challenge in the battle is getting the balance of objectives, it is too easy for the Hessians to just run off rather than stand and fight we played with a number of scenarios specific rules.
1. Greene’s brigade would enter turn one, but Sullivan would have to test at minus 3 from turn 2 onwards this represents their historical delay.
2. There are two hessian and one dismounted dragoon skirmish units, which had been posted as lookouts on the three main roads. We randomly rolled a D6 and they would be placed on the road 6” back as it happens I rolled three 3’s so they were placed 18” back towards the town.
3. Whilst the skirmishers could activate first turn the hessian infantry and the hessian cannon, would each have to take a decreasing D6 test before their activation. This represents their shock at being caught out by the bold American attack.
4. The Petty Run would act as difficult terrain so slow units down.
5. No units would have first fire rule, the Americans powder was damp after the crossing and the Hessians were caught by surprise.
6. objective wise the game would end when the Hessians were down to one third three smaller bridges if captured would give a minor victory for the Americans but they would need to fight through to the Assunpink bridge to claim a major victory.

As most of you know the British while attacking in previous battles have struggled where the odds have been less than 2 to1 so of course the Americans are roughly 2 to 1 (what could possibly go wrong !) so on to the action Christmas Day 1776
All quiet in Trenton, the weather is bad no attack expected !
The three Hessian regiment and artillery are located on the two main streets but fail to activate turn one. (Note to anybody with a mathematical mind please calculate the chances when rolling a D6 and being able to roll one lower than that required to activate for 5 turns in a row ! It simply shouldn’t be possible but that is exactly what the Hessian Artillery did !)
Meanwhile Greene’s brigade enters the table and opens fire on the outpost pushing them back 
Greene sends a number of troops to outflank the town.
Sullivan’s command is delayed and only his skirmishers arrive on turn two.
The Hessians on King Street have activated and formed up, finally a chance to give the Americans a taste of lead !
Skirmishers exchange fire on the river road
Despite the cold the Americans fan out quickly to assault the town from several directions
The Rall Grenadiers have activated and are moving to block the river road
The rest of Sullivan’s command arrives, but they are restricted by the Creek
Hessians in the town open up volley fire and send the skirmishers back
Greene advances with his artillery trying to get it into a best position
Sullivan held at the bridge but for how long
Things are already tight for the Hessians the cannon is continuing to fail to activate and the Lossberg Regiment on Queens street almost unbelieveably fails to activate FIVE yes FIVE turns in a row, they only needed a six !
Meanwhile somehow the Americans roll a double 6 and an additional infantry units lost in the snow perhaps arrives on the edge of the town 
Despite its impending doom the cannon crew stubbornly refuse to wake up, perhaps they had been drinking 
Sullivan is pushing along river road
American artillery finally opens up and the first Knyphausen regiment flees. bad to worse !
Finally when activation is automatic the hessian cannon is moved out of the church yard. My memory has blank out this disaster but I am not sure the cannon actually fired a shot before the crew had been shot from all sides.
The Americans are now pushing into the town
The Rall grenadiers have had little to do so far but they continue to block the road
At this point there is a tiny chance they could break out so they charge Sullivan lead unit. He very narrowly escapes death but then the Hessian fail their morale check and are forced to pull back.
The next turn they are hammered by Sullivan’s troops and the Hessians are left with only one unit.
Americans are swarming into the town
From all directions
If there were more Hessians they would be in trouble
But the last unit has chosen to flee across the Assunpink
The Americans celebrate a good victory, if not total victory as they didn’t manage to capture the Assunpink bridge when the game ended.

A splendid game and battle which rather too closely reflected the historical events. Despite the obvious disappointing result for the Hessians it was great fun. What went wrong ? I actually think the balance of 2 to 1 was about right. And the special rules felt appropriate. However, the Hessian activation and morale rolls were literally the worst you could possibly imagine. The cannon and the Lossberg regiment failing to activate for 5 turns really unbalanced our balanced scenario. Of course it isn’t really designed as a scenario where the Hessians will survive more can they hold on. I failed so many tests I lost count 😀

So that brings to a close 1776. I am hoping to pull together a little video if I get a chance over Christmas.

Thanks for looking 👍


Friday, 3 December 2021

A new project begins ……

Well we all need a new project don’t we ? , as a number of my projects have reached the scale where they are slowing down I felt it was time to kick off with something new. This certainly wasn’t a rash decision as I have been pondering for many months what direction I might go. Of course this could be quite a long post about other future projects which I have in mind and which one day may come to fruition but as a few of you will know I quite enjoy holding these projects in my head, sometimes for many years, I’ll occasionally write or jot down a few notes and then come back to them a long time later. But I try to avoid too much formality in my hobby so the list normally stays in my head.

Anyway a long winded introduction to my new project the Peninsular War which I have chosen to do in 28mm. The first unit finally got to the painting desk.

The 47th Ligne Regiment 
Here they are in attack column the figures are Warlord the flag Victrix, I’m not a button counter but feel these are good enough for me, the good thing is they are no harder to paint than AWI 

Thought I might just expand on a few questions I have had to answer myself before starting this project. Why Napoleonic ? Well like so many it is my first love and was my introduction to the hobby, my original Airfix collection does very occasionally get some table time which is quite nostalgic but slightly frustrating as it never quite gives the spectacle or the sense of battle I am looking for. Why 28 mm ? This is a tough question these days with so many scales and options I can definitely see myself collecting Naps in a smaller scale in the future but for the Peninsular campaign I feel I have a chance in 28 mm of achieving the scale I am looking for. Perhaps the biggest push has been my success at the AWI in about 2 years I have collected and painted enough figures for both sides for a sizeable battle. I like the feel of the 24 man units and as the initial stages of the Peninsular develops it will allow smaller skirmish scale battles. My plan will be to field skirmishers on individual bases which can be ranked up if needed. Ideal for the 95th ! This means I know I won’t have to wait too long before seeing some action even if larger battles take a bit longer, the 24 man units break down easily for larger battles as well. Why the Peninsular ? you shouldn’t really need to ask this question should you ? I guess variety, colour, terrain….yes I plan some new buildings but of course a small factor is it builds on my Al Andalus collection. Why Warlord ? Having answered in my head the questions above I spent a lot of time looking at figure options. Having Perry in AWI and ACW it was an obvious option and some of these will find their way into the collection. But in the end I plumbed for the Warlord starter armies which I was able to purchase at a ridiculously cheap cost. With the addition of some skirmishers ? I’m getting a box of the 95th for Christmas, gives me a good starting point. Those sharp eyed will have spotted a box of cavalry from the show a couple of weeks ago 🙂 perhaps the most fun is allowing me some time to research nonsense like plume colours and flags such a lot of fun and options for me to mess things up 😀!!!!!

Anyway enough of my ramblings this project will bumble along in the background 👍