Another dollop of juicy ACW goodness as Stew would say. Not sure why we played two ACW in a row but I’m glad we did. Here we played a large Shiloh scenario from This Bloody Field again by Brad Butkovich. This is a fairly big scenario so we were playing on my larger outdoor gaming table which was stretched to 12x6 feet and combining mine and Martin’s ACW collections. Breaking with tradition we chose to test out Honours of War as a ruleset for ACW. More of that a bit later perhaps.
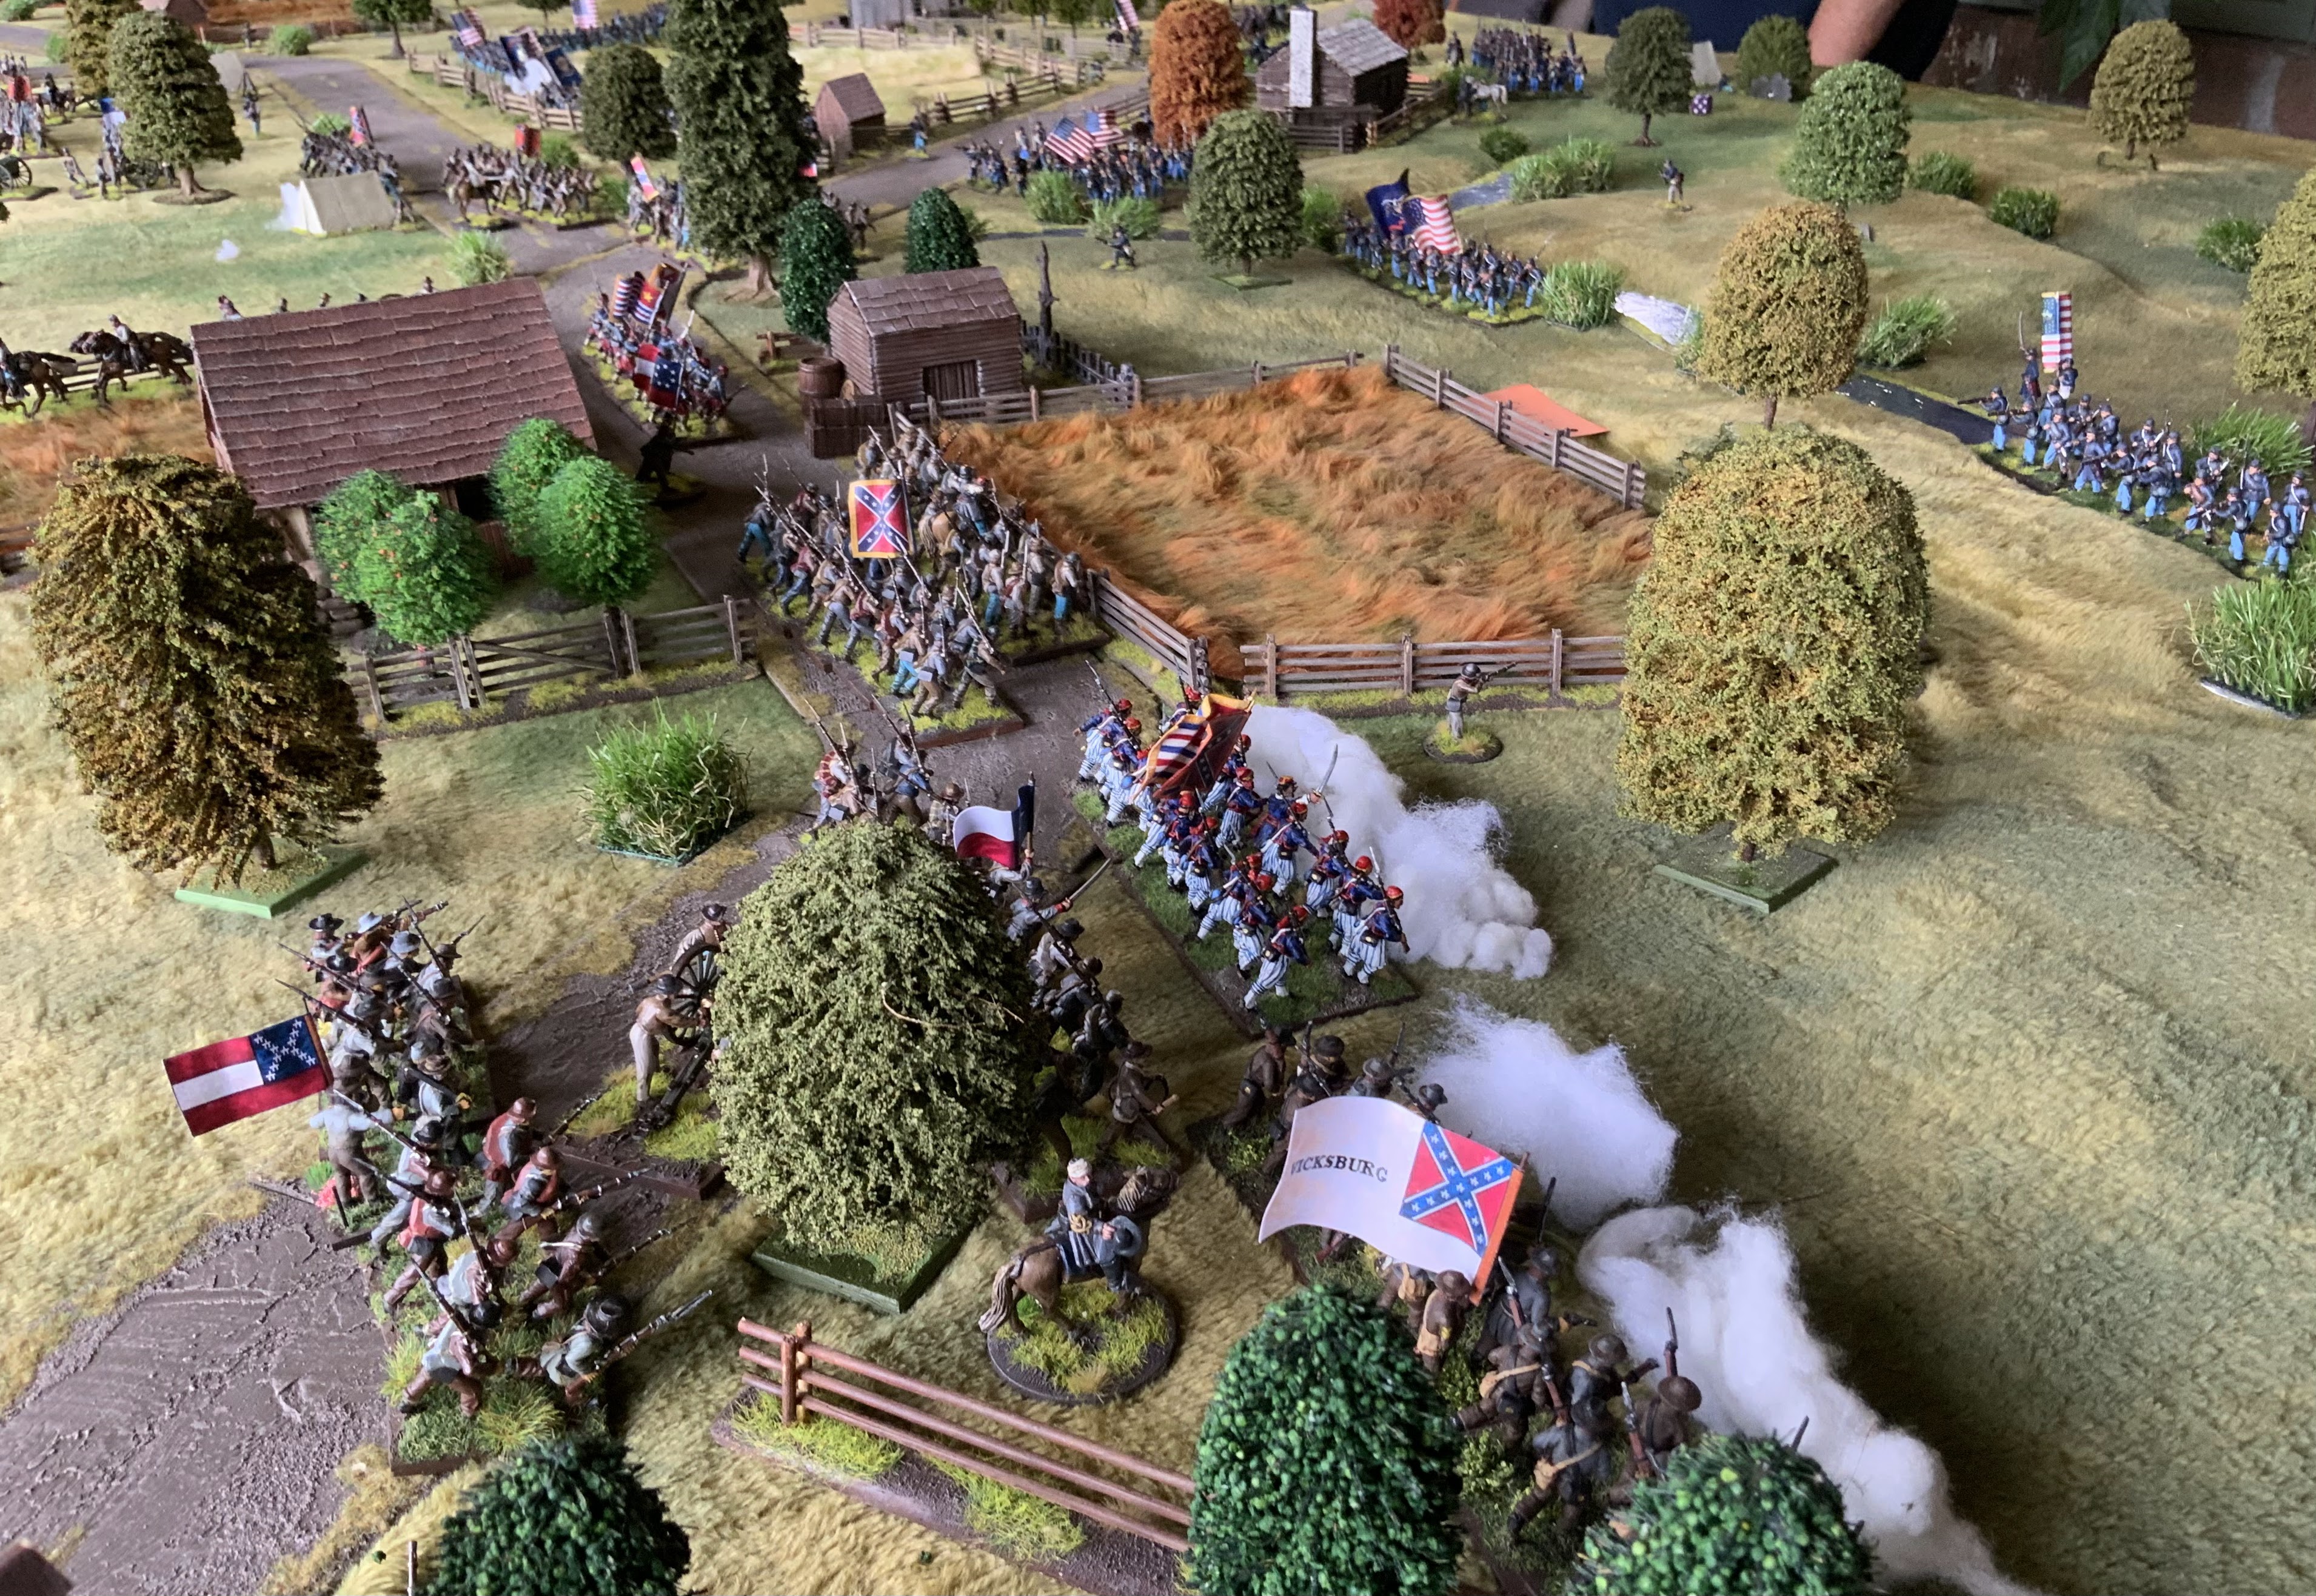
In terms of scenario the battle for the Peach Orchard took place around 10:30 on day one of Shiloh. General Albert Johnston had thought he had turned the Union line only to find that part of Sherman’s Division Colonel Stuart’s Brigade had been detached to the far left of the Union line. This left a significant gap in the Union line which the Confederates attempted to exploit. The confederates made a frontal assault, but on their left they discovered difficult ground in the ravines bordering the Tennessee River. In the centre the Union forces pulled back to the edge of the Peach Orchard forcing the rebels to attempt to cross the large open ground of the Sarah Bell cotton field. The right wing of the Union line is bounded by the Thick trees and undergrowth of the ‘Hornet’s Nest’ which saw fighting later in the day.
The objective for the Confederates is to smash through the gap and turn the Union line, the Union army needs to get its reserves into play to fill the gap as quick as possible before Col Stuart’s brigade is wiped out.
The battle set up, 12x6 table the streams at this end of the table represent the often dry ravines and very small streams that feed into the Tennessee River all troops in this area obtained an extra cover bonus and a penalty to movement. The tents represent the union camps and any Rebel passing through a tent must test to check if they have stopped to loot breakfast. The whole of the battlefield is light woods except those designated fields and the roads.
BG John J Jackson’s Brigade from Alabama moving upto the Larkin Bell Farm, the isolated elements of Stuart’s brigade beyond the Hamburg Road
Williams Brigade lined up along the Sarah Bell’s Cotton field
The hornets nest , Union reserves unaware at this stage that a huge attack is coming
The peach orchard, currently quiet
Jackson and Chalmers Brigade’s start well but then suffer a series of bad activation rolls slowing their advance
This is compounded when troops from Jackson’s brigade stop to ransack the Union tents !
Finally they get moving again but they have lost valuable time
Firing opens up from the confederate line but Colonel Stuart following his historical counterpart pulls back into the difficult terrain to gain time
Bowen’s brigade can now be seen making its first assault on the Cotton field across the Hamburg-Purdy Road
To the west Statham is holding back
Confederates are moving in force across the main road, but whilst the Rebels have been hindered by a number of poor activation rolls 1’s the Union General has rolled several 6’s getting double moves for his reserves
The Union line in this section is complete but fairly thin ?
The confederates charge in to break the line
And have some success pushing one unit back across the cotton field
To the left musket fire opens up rather than the bayonet
But the Union troops of Williams get the best of it forcing some rebels to pull back
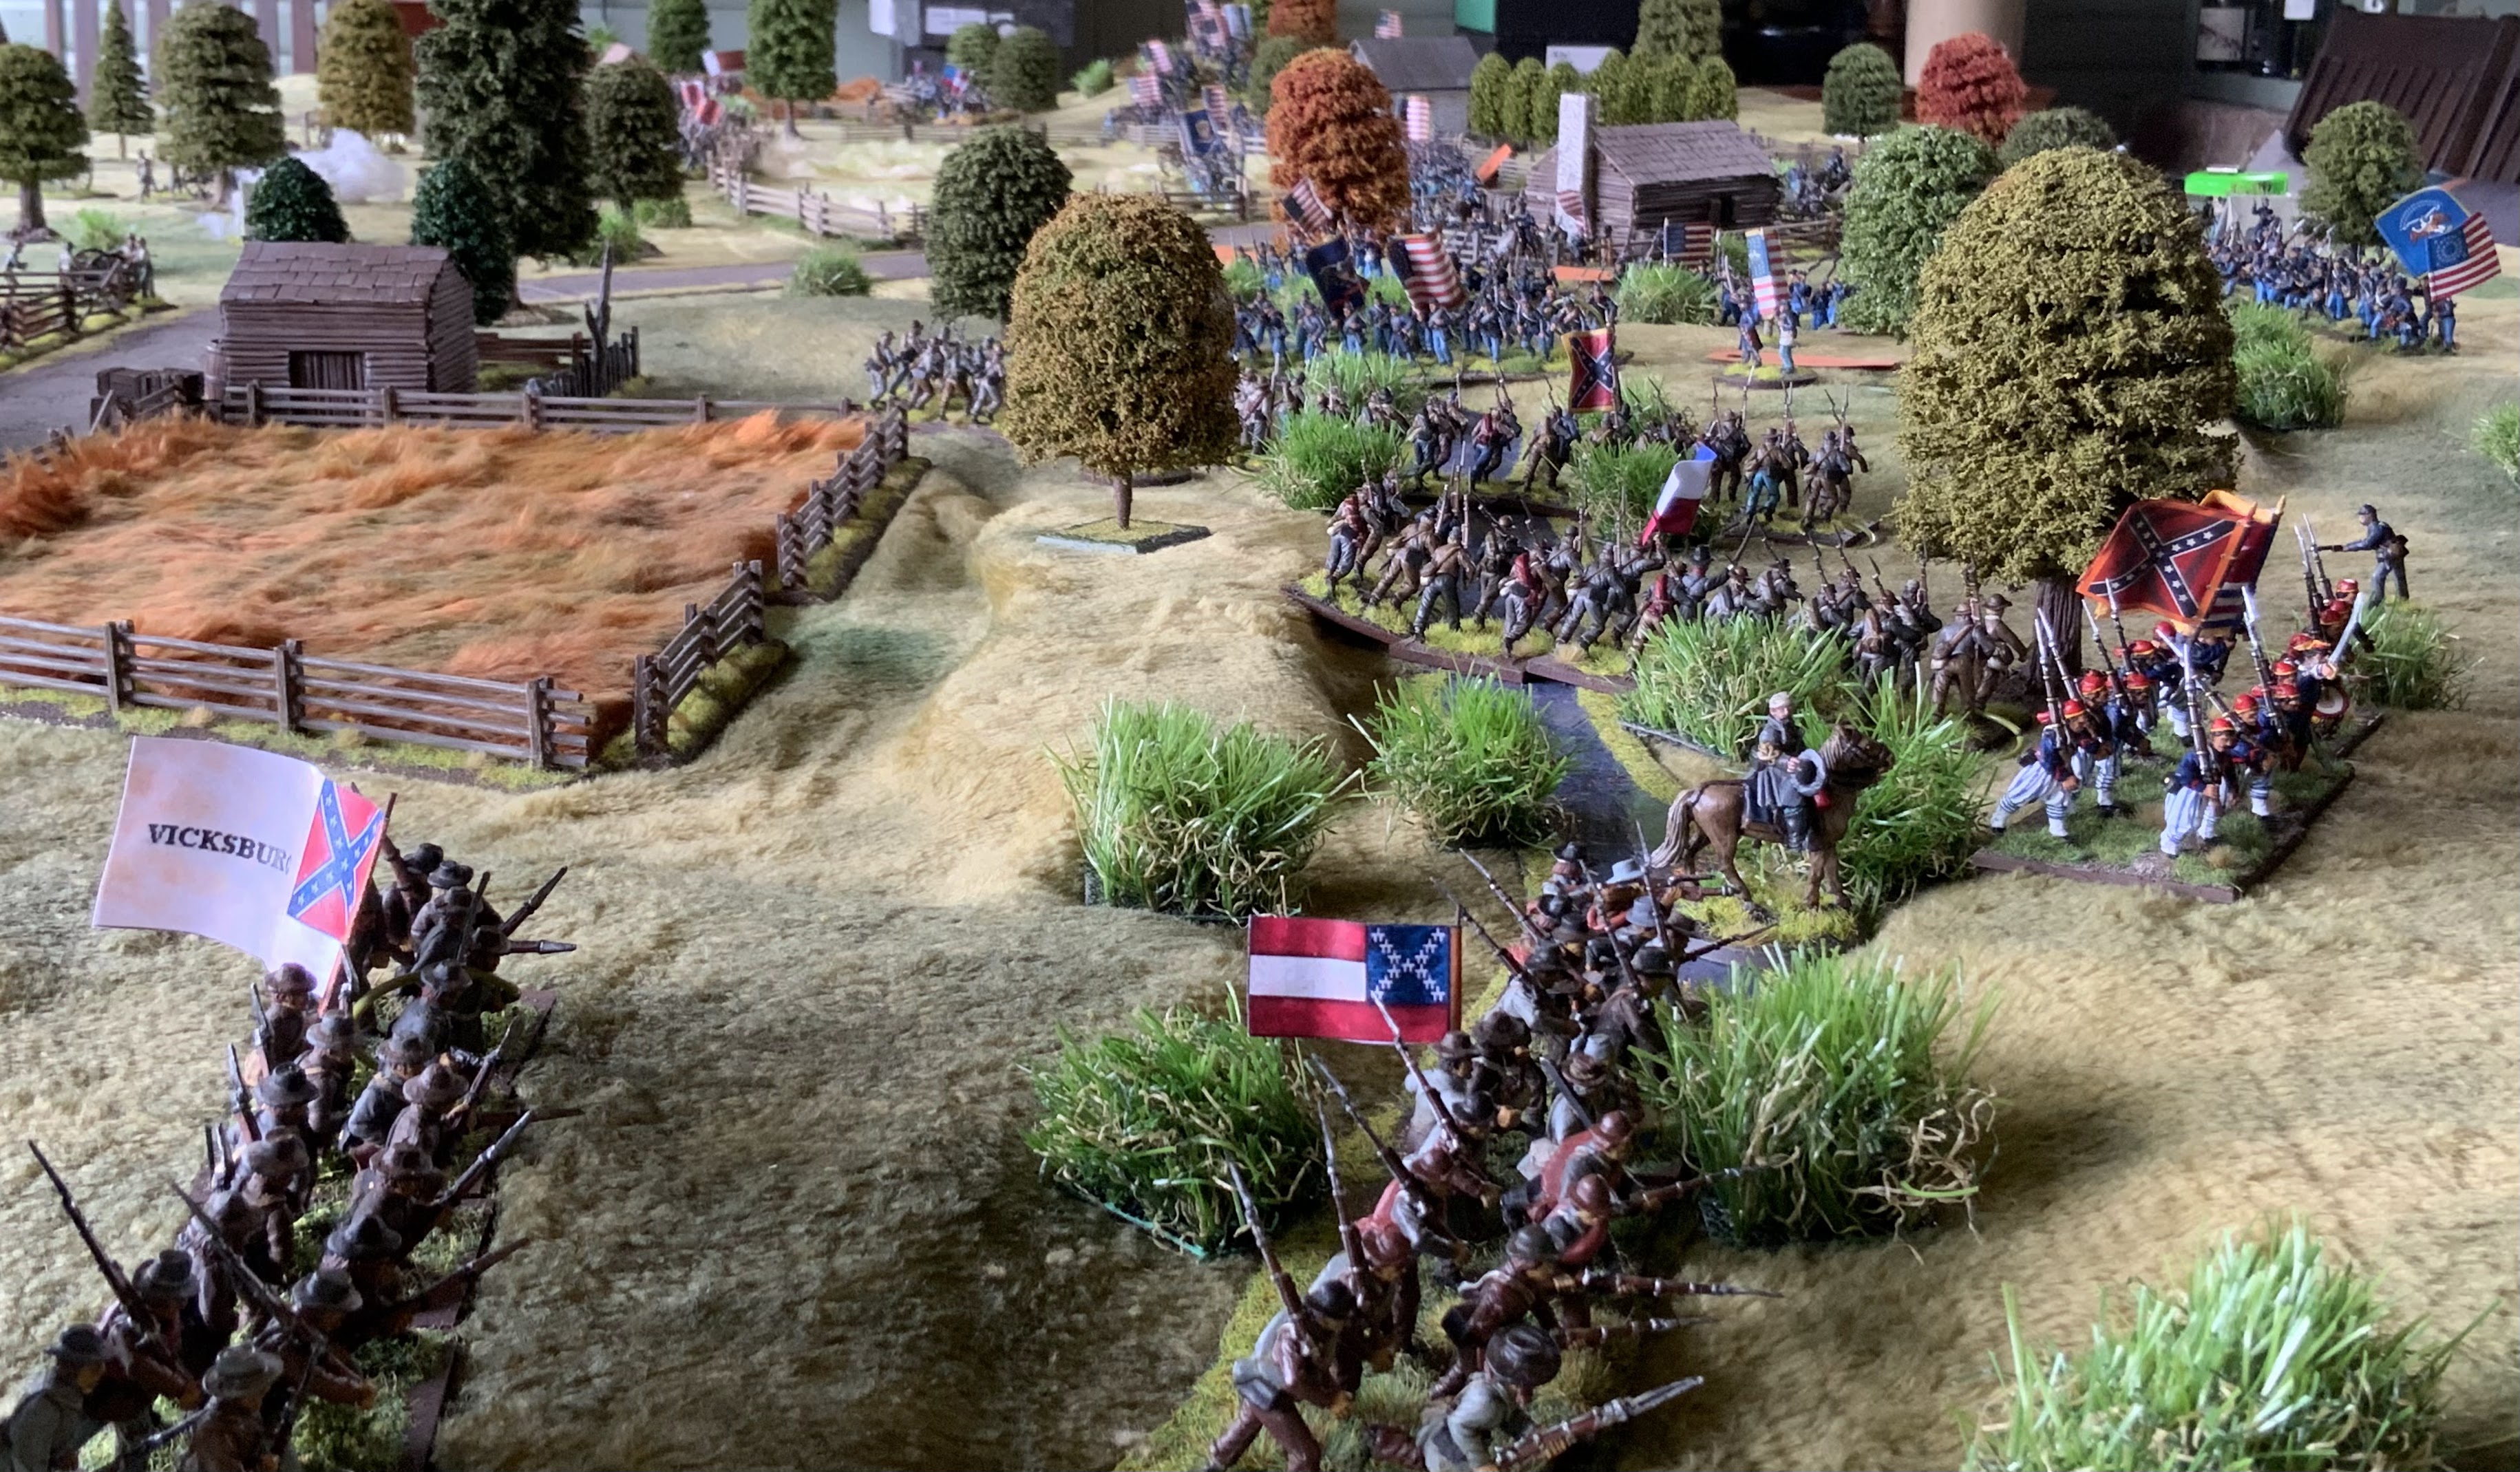
Fierce fighting now around the road junction where the reserves of McArthur have arrived
Around the fence at the cotton field both sides are taking a battering but nobody has the ability to capitalise on the gaps opening up
Chalmer’s brigade has now pushed through and Col Stuart’s Brigade is massively outnumbered
Union troops are being forced to retreat back across the cotton field, where they hope to reform
Again rebels charge in around the road junction but the fighting isn’t decisive
More confederate troops are arriving some from Stephens Brigade from their previous assault on the Hornets Nest
The Union have eventually lost their left flank, but the confederates have a long way to move to capitalise on the breakthrough, top right can be seen the final Union reserves no in place to hold the Union left
With no chance at the Hornets nest Stephens takes his brigade further East but it may take too long to bring them into the battle.
The confederates swarming through the ravines
Unfortunately at the Cotton field it is a different story here the Union have regrouped on the far edge making it a near impossible position for the rebels to get across, they try though
The rebel reserves are now East of the wheatfield but still too far from the action
The rebels attempt to drive forward and sweep in from the right flank, but suffer a series of set backs. Suddenly two brigades collapse exhausted by the fighting since early morning.
Here we called the battle to the Union, they had adequately halted the Confederate attack. The confederates had the numbers but in classic wargaming style they started off with a series of failed activation rolls this just managed to slow the advance long enough for the Union to plug the main gap with reserves. An excellent battle lasting several hours.
As for Honours of War for ACW, it obviously requires very little alteration from the core rules and in its favour the ability for units to flee then reform works quite well as this often happened in ACW battles. The general mechanics worked fairly well although we needed coloured markers for each brigade we have these for SYW and it became difficult sometimes to remember which Unit was in which brigade. The main criticism are the ranges, we use the 28mm ranges for our 10 mm SYW and that works well, transferring these same ranges to 28mm ACW just didn’t work for me and if we played again I think we would increase the ranges/distances across the board. So they certainly work ok although I am not sure they add anything different to our house Bolt Action rules. Obviously one benefit is you don’t need to remove bases which means you COULD fight using these rules and 12 man units to recreate larger battles and simplify the terrain appropriately. This would work and is an interesting idea for the future.
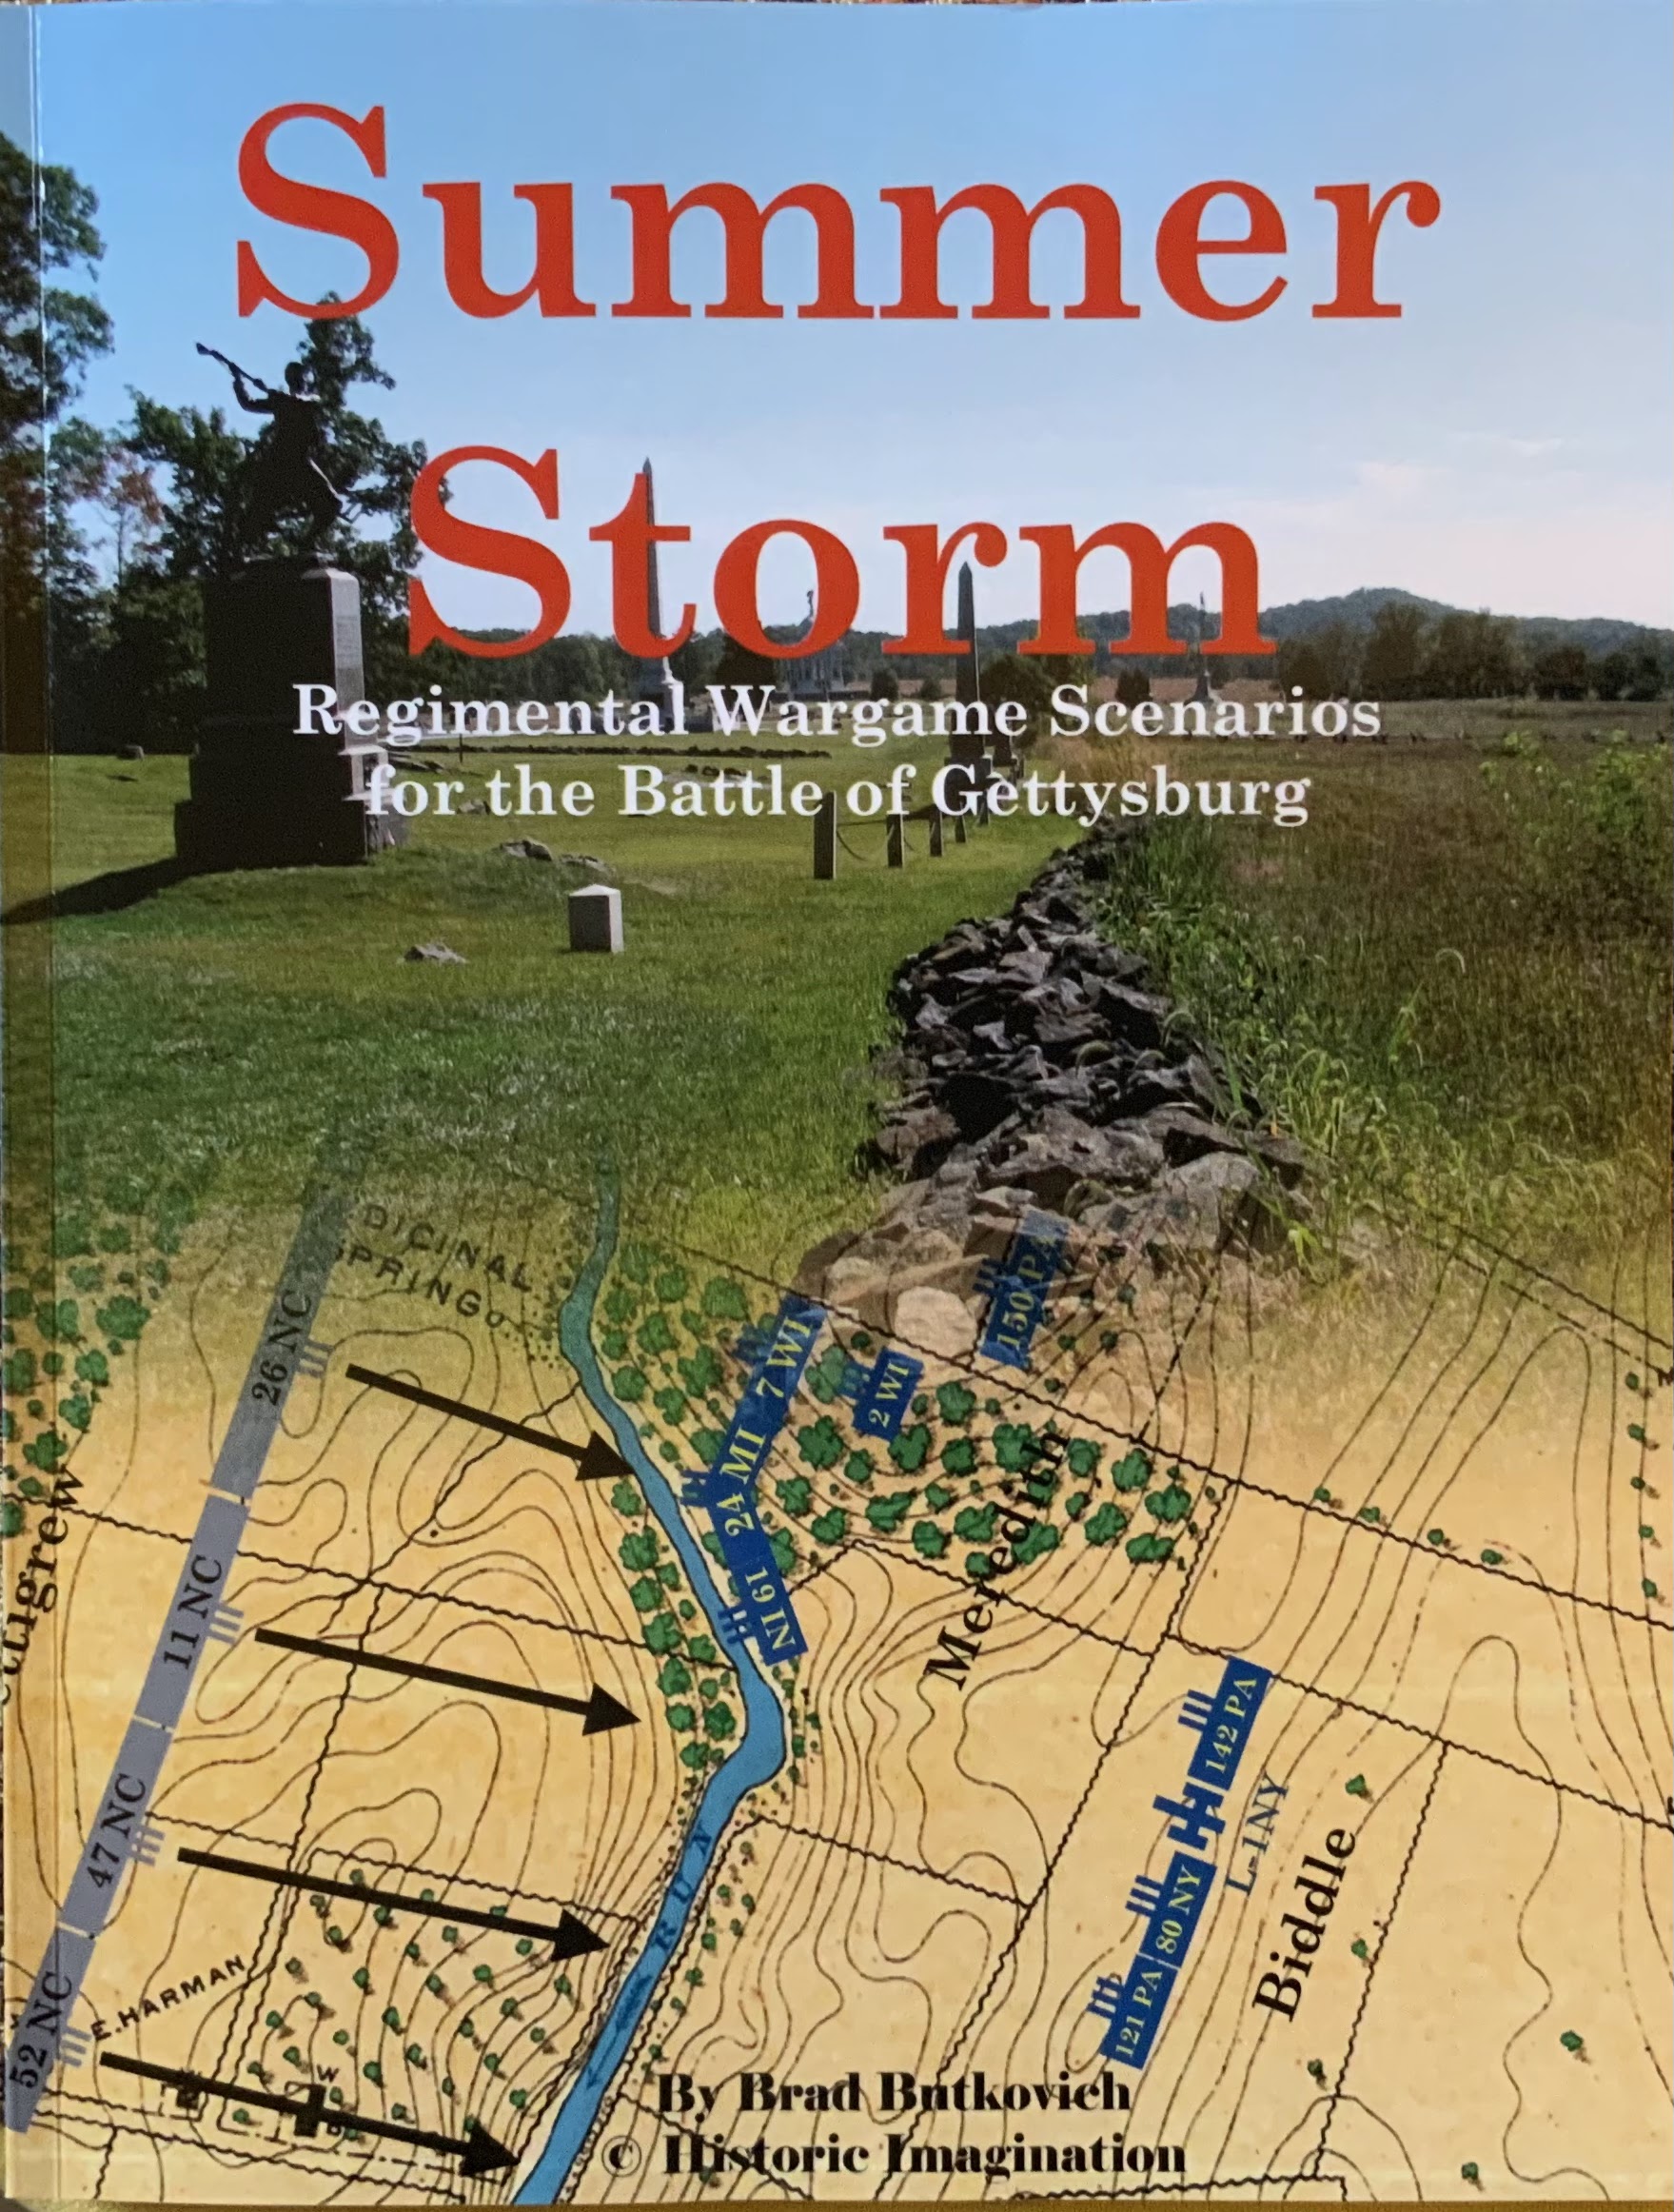
Anyway with all this ACW I decided it was time I buy Brad’s Gettysburg scenario book and it duly arrived in the post this morning👍
Thanks as always for popping by


A fab table and game, really superb and no doubt a very memorable gaming session for both your good self and Martin to look back on.
ReplyDeleteThanks Norm, I do love playing historical battles allowing me to learn more about the history as I go along. Each battle brings its own memories 🙂
DeleteAnother beautiful table and another win to the Union forces, although it seemed a lot closer than the Antietam encounter.
ReplyDeleteThanks Lawerence both felt close during play, as always it is hard to tell if there is some bias in the setup unless you play the scenario several times, unfortunately multiple games isn’t really my option, but perhaps we will return to these two in the future.
Deleteanother great game (winning helps). I agree with you on the rules. Actually it just felt like a 7YW game and not an ACW game. I like our home brew rules. See you soon
ReplyDeleteCheers Martin hopefully at Partizan if not before 👍
DeleteOnce again, a wonderful advertisement for ACW gaming Matt. The table and figures are all sublime, and it certainly seemed like an action packed game, that gave a realistic outcome...breaking through the Union position would have been a hard task. Would be interesting to replay it and "fix" the activations, so the Rebs moved quicker and the Union were unable to get double movements for their reinforcements....
ReplyDeleteThanks Keith and agree completely it would be interesting to see if without the activation issues the Rebels could make a more decisive breakthorugh ? Perhaps another day
DeleteSuperb, Matt! You set the finest looking Wargaming displays. Hard to believe that the photos are in-game snapshots and not staged. As Keith notes, it might be interesting to replay and see if the Rebel slothiness in Game#1, if remedied, could affect the battle outcome. At Shiloh, the Rebs had a hard time coordinating their attack through the woods while in Napoleonic-style battles line so maybe your results reflected Reb maneuver difficulties quite accurately?
ReplyDeleteThanks Jon very kind. My sense at Shiloh was both sides were in a bit of a command pickle and knowing the terrain I can only imagine to total confusion on that morning as attacks were made and repulsed ?
DeleteWhat a game! What a battle!
ReplyDeleteThanks Michal 👍 much appreciated
DeleteA superb looking game
ReplyDeleteThanks Neil 👍
DeleteAbsolutely splendid looking game! Plus a ding dong battle too. My own wargames “barometer” is swinging back around to my ACW collection so this AAR was an especial treat 😎
ReplyDeleteCheers
Matt
Thanks Matt a good battle, I guess I have always been drawn to ACW because Featherstone chose to include it in his Wargames book. What is nice is we can now play the battle and produce the spectacle that we dreamed of as boys 👍
DeleteA fine table and a grand game, topped off by the right result. Your choice of rules for the ACW is somewhat odd though to my taste.
ReplyDeleteThanks David , we wanted to test HoW to see if it worked for larger battles, which it did but it didn’t really give anything extra so back to the house rules👍
DeleteI will need to look at those books. Lovely table.
ReplyDeleteThanks George if nothing else they provide a really easy to digest break down and OB for the various battles into sections.
DeleteA great looking game and a gripping battle report. Nice to see all those regiments and flags manoeuvring across a beautifully set out table.
ReplyDeleteThanks Iain and thanks for taking the time to comment 👍
DeleteA fine looking spectacle there Matt, I don't know how you retain all the amendments you do on the various rule sets for different periods. I have trouble remembering the period adaptations for one set🤔
ReplyDeleteThanks Phil, of course I forget lots of rules as we go along 😀
DeleteYes I would say. More glorious ACW. Shiloh is another fun battle but large and takes a lot of troops. Looks like you pulled it off well. 😀
ReplyDeleteHow do you not have the Gettysburg book yet? I have all those books. I think the barlows knoll scenario is quite good. I have games it a few times.
Thanks Stew thought you might like it , I have been working through as many of the Shiloh and Antietam scenarios over the last couple of years and have played a few Gettysburg scenarios in the past but you are right it was time I got the book 👍
DeleteA truly splendid affair Matt…
ReplyDeleteBeautifully presented…as always.
I don’t mind trying out something new …there is always so new to learn that you may be able to add to your more usual rules.
All the best. Aly
Thanks Aly, we are all at heart generals of habit I suspect but as you say trying a new ruleset is often worth it to see if it adds something different. We certainly like HoW it is just they don’t add anything to ACW.
Delete